前言
前一段时间风风火火的Spring RCE,看起来限制条件还是挺多的,学习一下。
环境搭建
漏洞信息,要求在JDK9+的环境下在Tomcat部署war包,如果是通过SpringBoot可执行Jar文件的方式部署则漏洞不可用,但不排除有更多方法可以完成利用。
先搞个Spring MVC方便利用,使用IDEA新建项目:
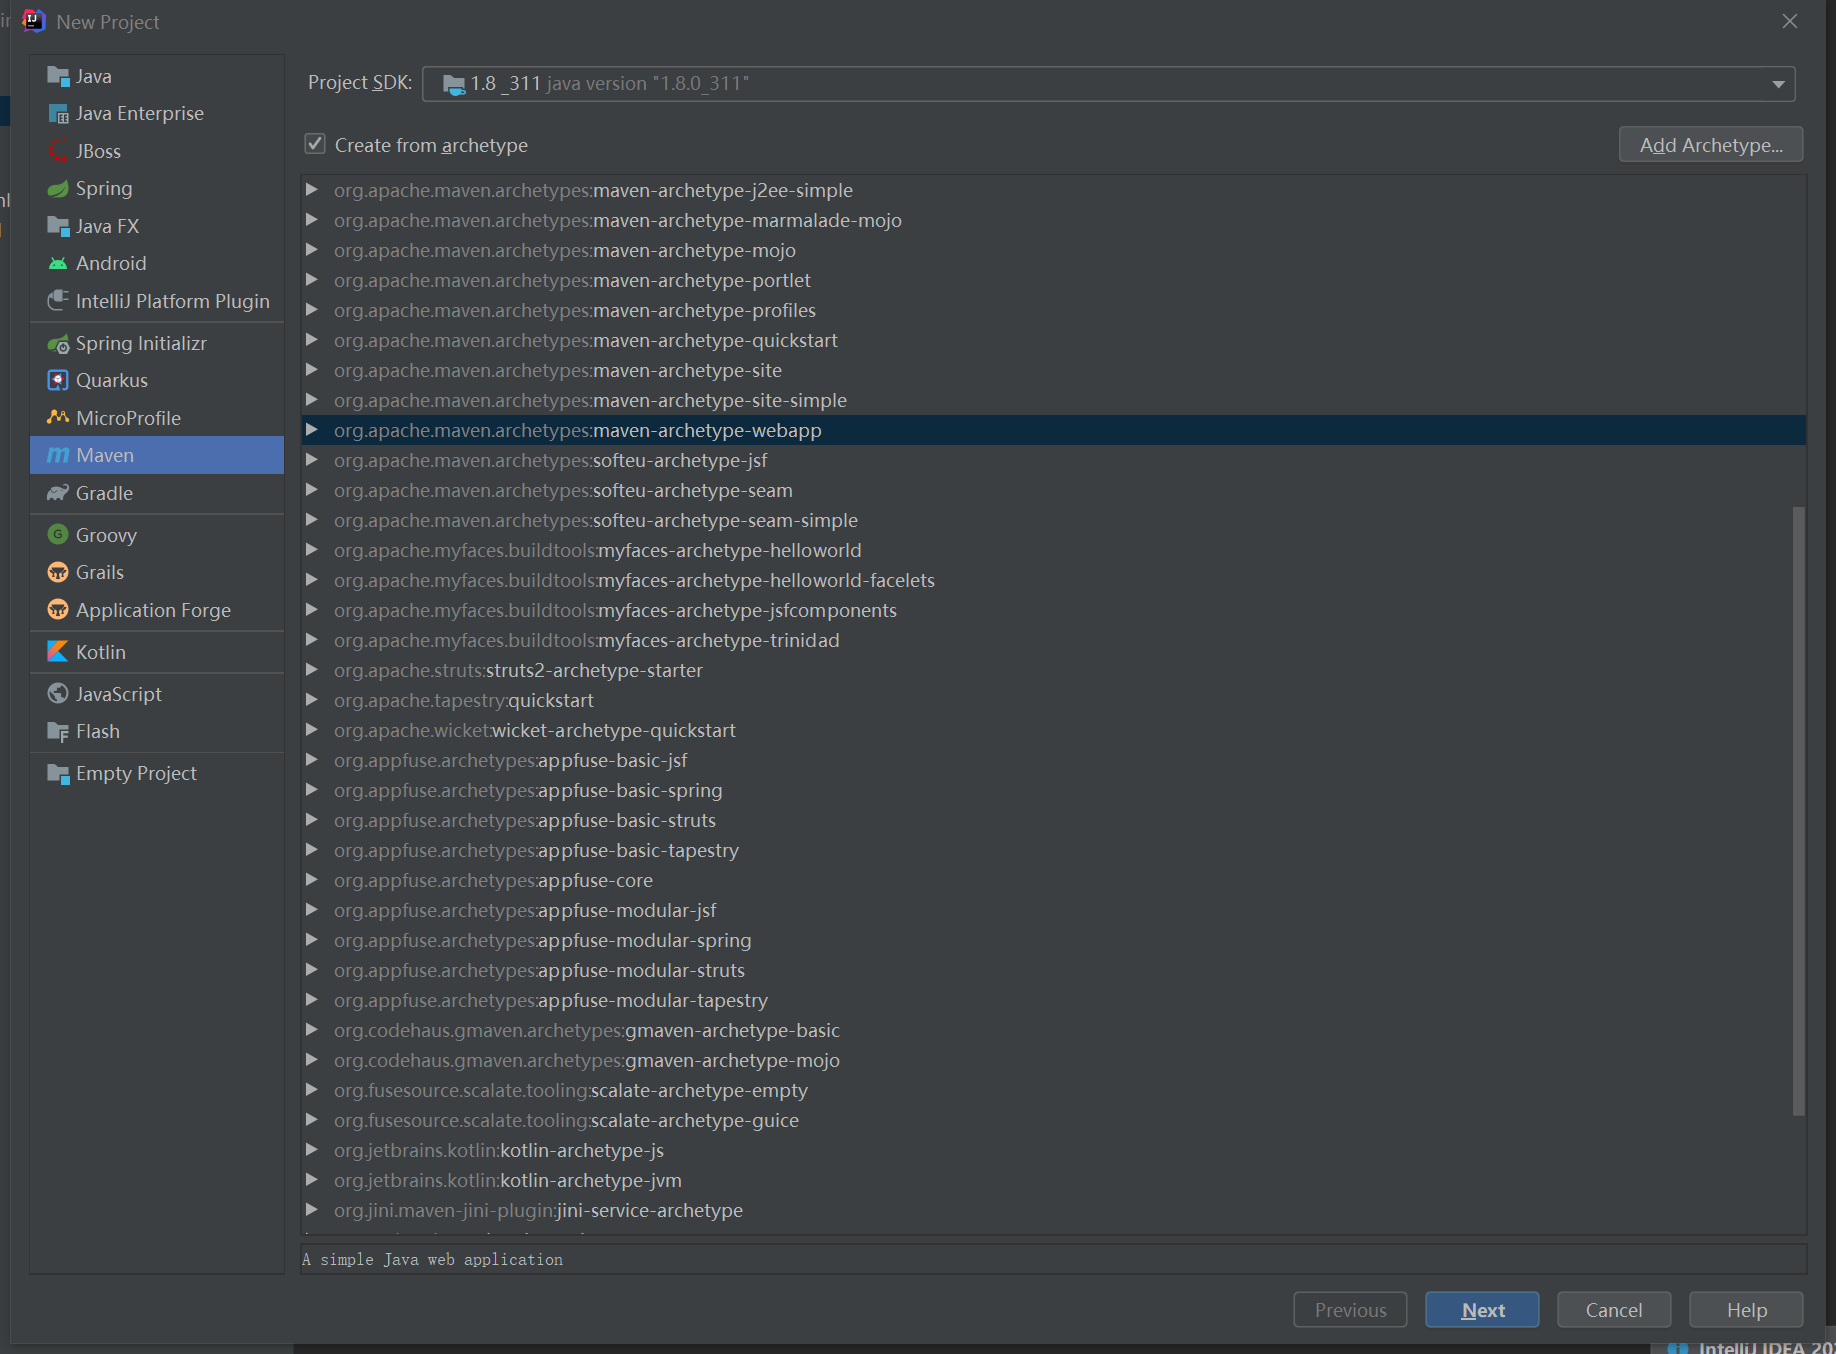
再添加依赖:
<dependency>
    <groupId>org.springframework</groupId>
    <artifactId>spring-webmvc</artifactId>
    <version>${spring.version}</version>
</dependency>
新建控制器包com.example.controller,里面放一个IndexController控制器:
package com.example.controller;

import org.springframework.stereotype.Controller;
import org.springframework.web.bind.annotation.RequestMapping;

@Controller
@RequestMapping
public class IndexController {
    @RequestMapping("/index")
    public String index() {
        return "index";
    }
}
新建resources文件夹,在resources文件中新建spring config文件spring-mvc.xml:
<?xml version="1.0" encoding="UTF-8"?>
<beans xmlns="http://www.springframework.org/schema/beans"
       xmlns:xsi="http://www.w3.org/2001/XMLSchema-instance" xmlns:mvc="http://www.springframework.org/schema/mvc"
       xmlns:context="http://www.springframework.org/schema/context"
       xsi:schemaLocation="http://www.springframework.org/schema/beans http://www.springframework.org/schema/beans/spring-beans.xsd http://www.springframework.org/schema/mvc https://www.springframework.org/schema/mvc/spring-mvc.xsd http://www.springframework.org/schema/context https://www.springframework.org/schema/context/spring-context.xsd">
    <!--开启框架注解-->
    <mvc:annotation-driven/>
    <!--开启注解扫描-->
    <context:component-scan base-package="com.example.controller"/>
    <!--视图解析-->
    <bean id="internalResourceViewResolver" class="org.springframework.web.servlet.view.InternalResourceViewResolver">
        <!--前缀-->
        <property name="prefix" value="/WEB-INF/views/"/>
        <!--后缀-->
        <property name="suffix" value=".jsp"/>
    </bean>
</beans>
在WEB-INF下新建views文件夹,里面放一个index.jsp模板文件:
<%@ page contentType="text/html;charset=UTF-8" language="java" %>
<html>
    <head>
        <title>Index</title>
    </head>
    <body>
        <h1>Index</h1>
    </body>
</html>
最后修改web.xml:
<!DOCTYPE web-app PUBLIC
 "-//Sun Microsystems, Inc.//DTD Web Application 2.3//EN"
 "http://java.sun.com/dtd/web-app_2_3.dtd" >

<web-app>
    <display-name>Archetype Created Web Application</display-name>
    <servlet>
        <servlet-name>SpringMVC</servlet-name>
        <servlet-class>org.springframework.web.servlet.DispatcherServlet</servlet-class>
        <init-param>
            <param-name>contextConfigLocation</param-name>
            <param-value>classpath:spring-mvc.xml</param-value>
        </init-param>
        <load-on-startup>1</load-on-startup>
    </servlet>
    <servlet-mapping>
        <servlet-name>SpringMVC</servlet-name>
        <url-pattern>/</url-pattern>
    </servlet-mapping>
</web-app>
配置war部署,看到控制器运行结果:

接下来开始布置漏洞环境,在com.example包下新建一个model包,放一个有基础getter和setter的POJO类:
package com.example.model;

public class User {
    private long id;

    private String username;
    private String password;
    private String email;

    public long getId() {
        return id;
    }

    public void setId(Long id) {
        this.id = id;
    }

    public String getUsername() {
        return username;
    }

    public void setUsername(String username) {
        this.username = username;
    }

    public String getPassword() {
        return password;
    }

    public void setPassword(String password) {
        this.password = password;
    }

    public String getEmail() {
        return email;
    }

    public void setEmail(String email) {
        this.email = email;
    }

    public String toString() {
        return "[Username: " + username + ", Password: " + password + ", Email: " + email + "]";
    }
}
然后修改一下控制器:
@RequestMapping("/user")
public String user(User user) {
    System.out.println(user);
    return "user";
}
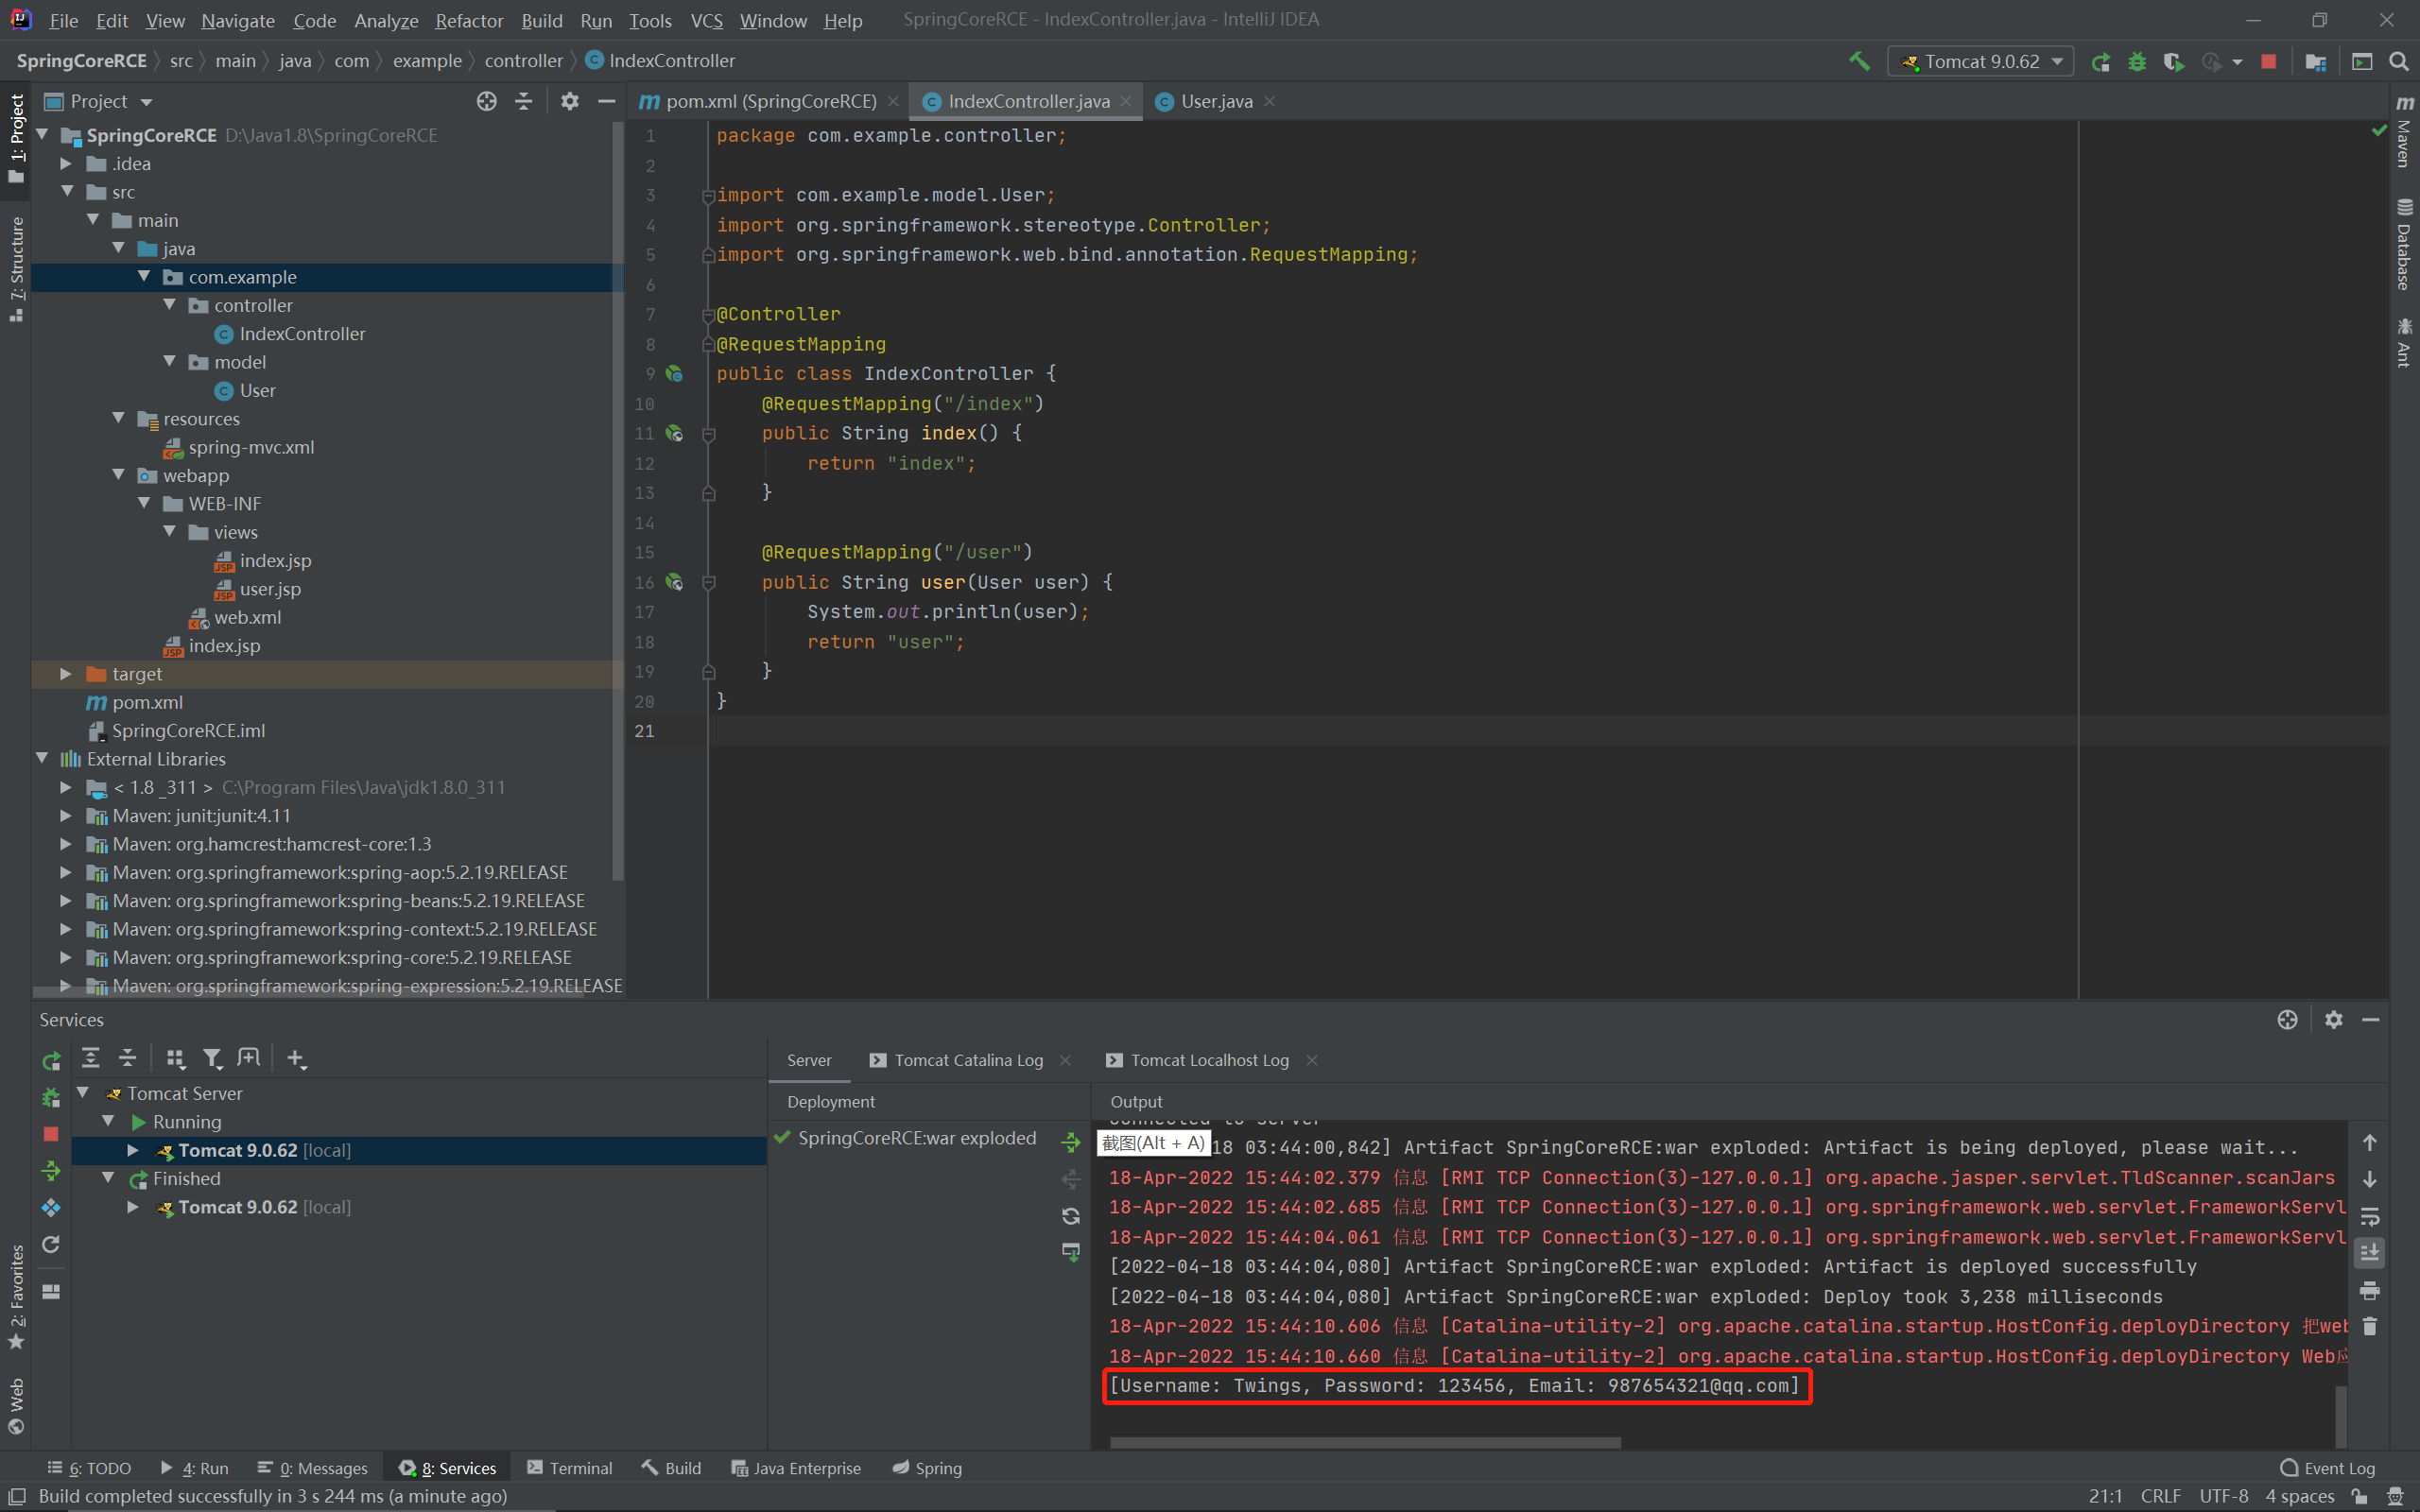
可以看到对象绑定成功了:
漏洞分析
给User类中的setter下一个断点,看看他的对象绑定是如何进行的,从dobind开始找到AbstractNestablePropertyAccessor类的setPropertyValue函数:
public void setPropertyValue(PropertyValue pv) throws BeansException {
    AbstractNestablePropertyAccessor.PropertyTokenHolder tokens = (AbstractNestablePropertyAccessor.PropertyTokenHolder)pv.resolvedTokens;
    if (tokens == null) {
        String propertyName = pv.getName();

        AbstractNestablePropertyAccessor nestedPa;
        try {
            nestedPa = this.getPropertyAccessorForPropertyPath(propertyName);
        }
        ...

        tokens = this.getPropertyNameTokens(this.getFinalPath(nestedPa, propertyName));
        if (nestedPa == this) {
            pv.getOriginalPropertyValue().resolvedTokens = tokens;
        }

        nestedPa.setPropertyValue(tokens, pv);
    } else {
        this.setPropertyValue(tokens, pv);
    }

}
此时的参数pv:
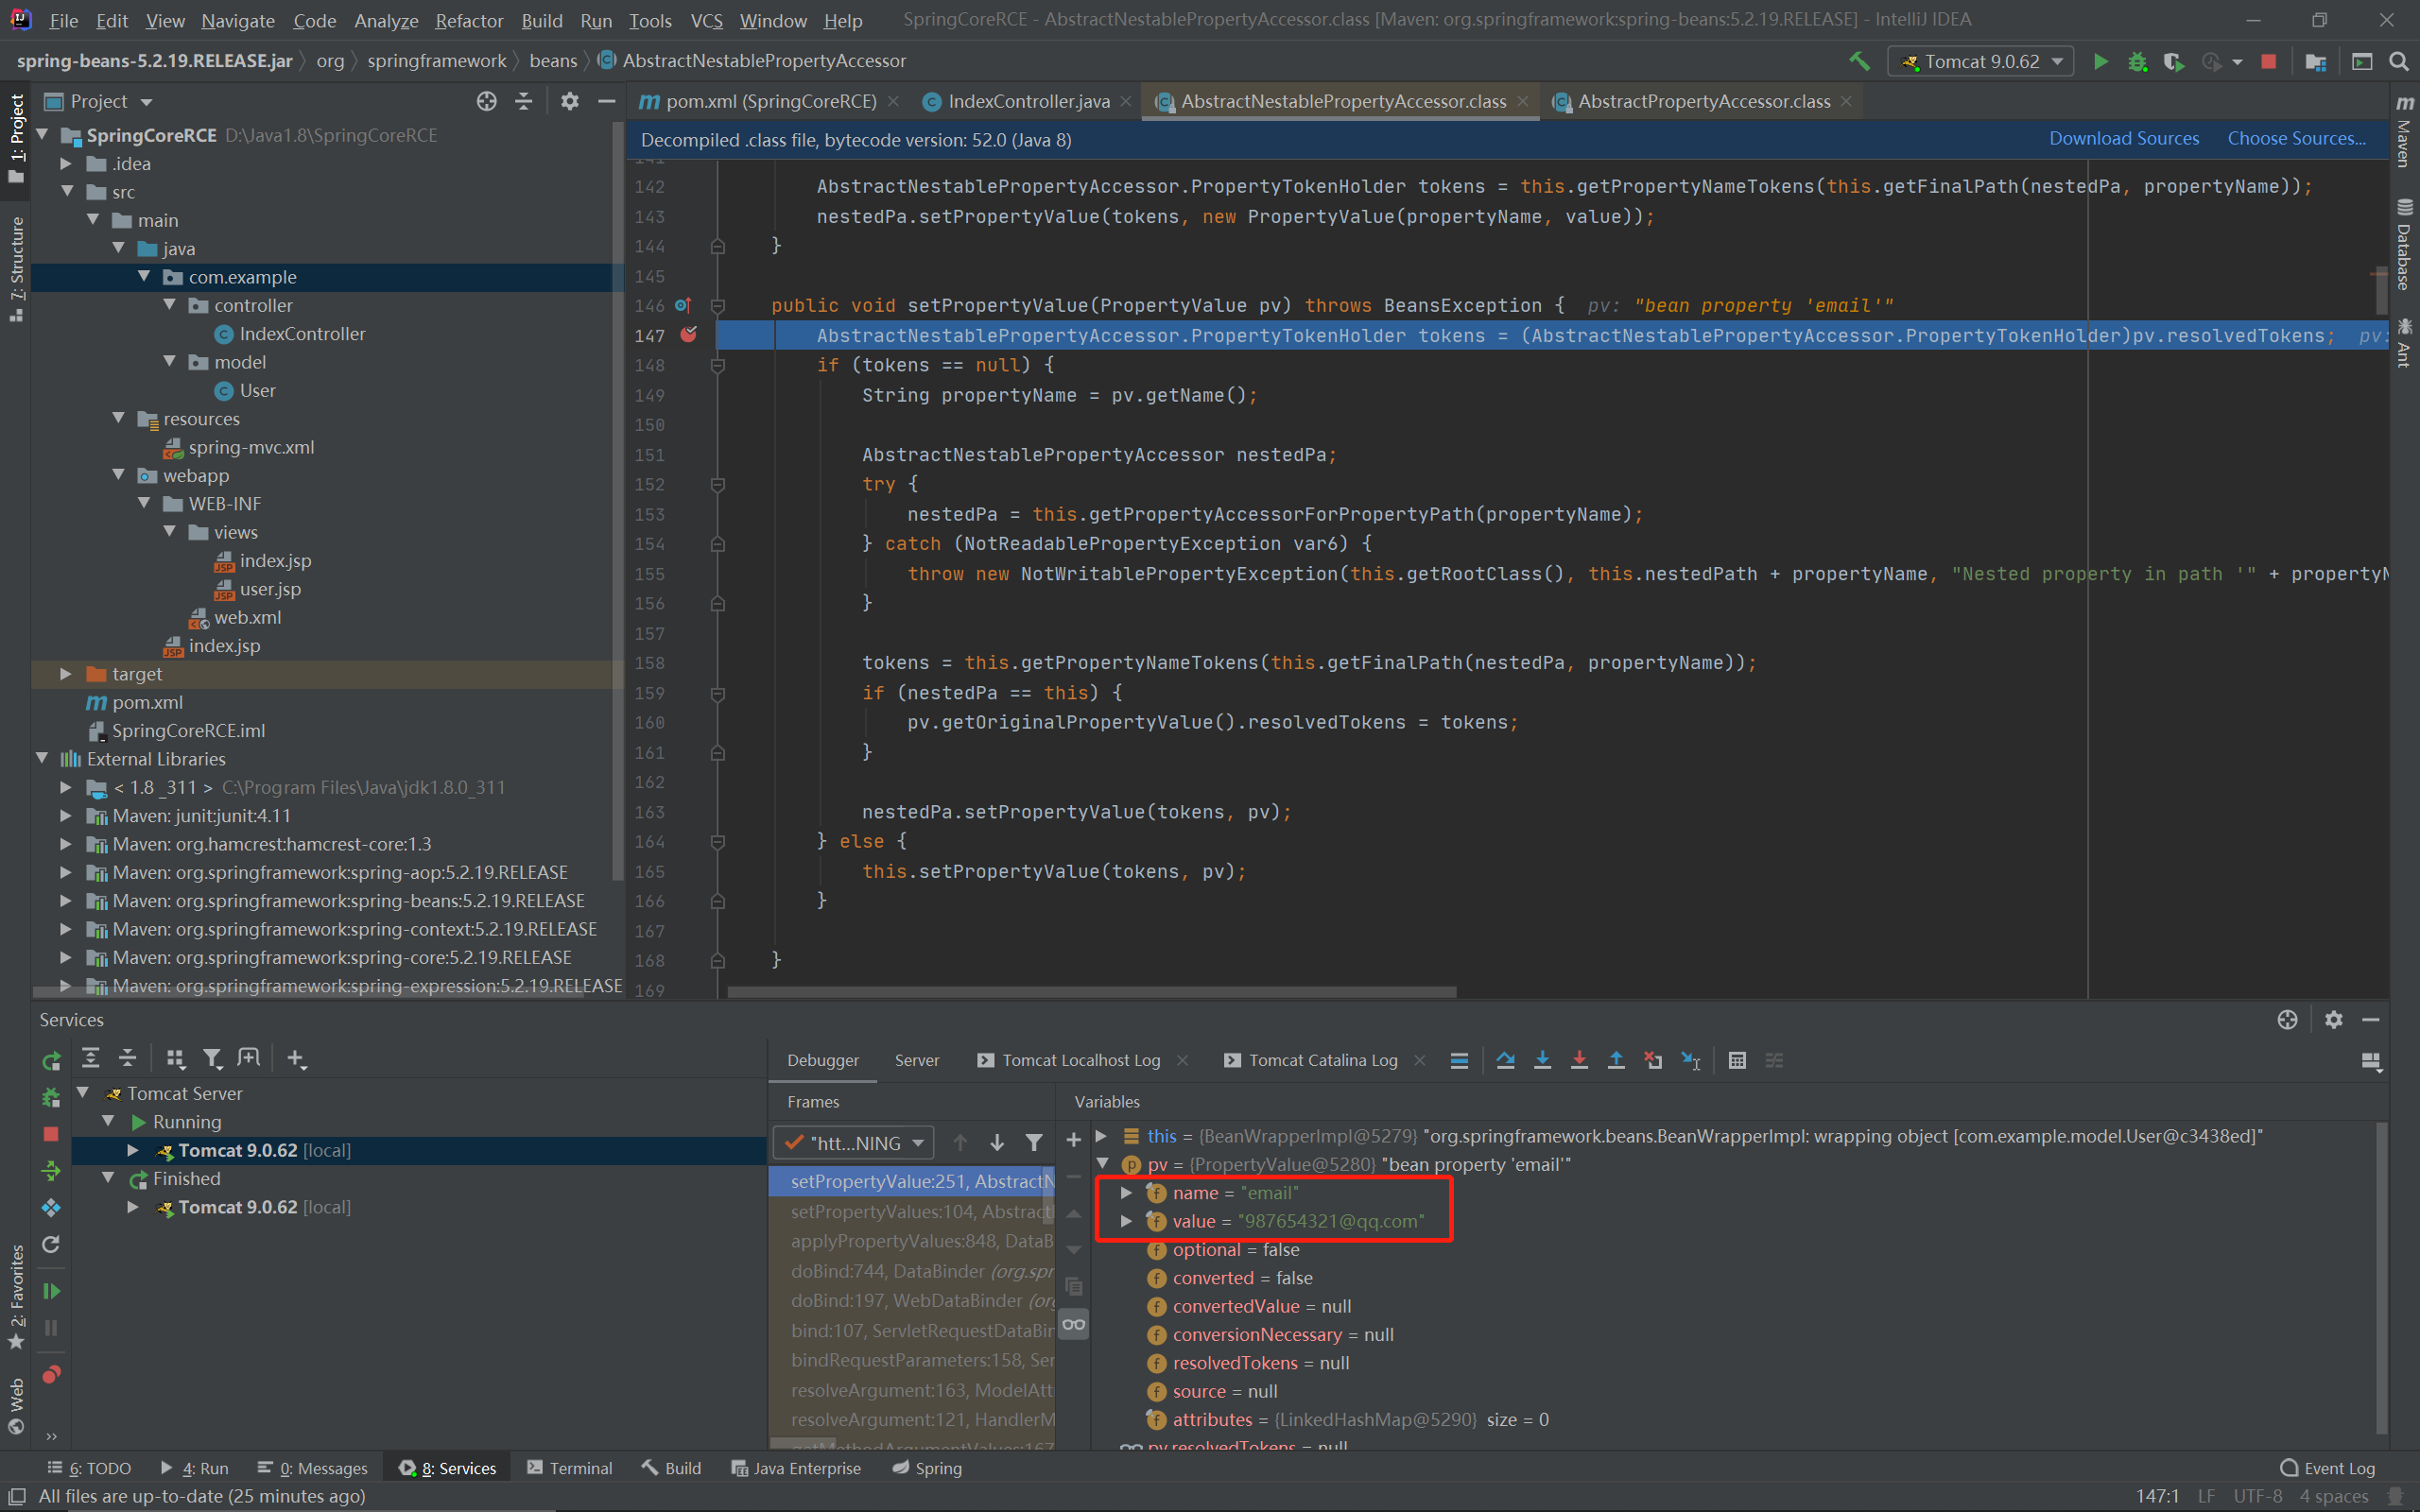
即我们输入的email,下一步就是获取这些数据要赋值到什么属性里去,跟入getPropertyAccessorForPropertyPath函数:
protected AbstractNestablePropertyAccessor getPropertyAccessorForPropertyPath(String propertyPath) {
    int pos = PropertyAccessorUtils.getFirstNestedPropertySeparatorIndex(propertyPath);
    if (pos > -1) {
        String nestedProperty = propertyPath.substring(0, pos);
        String nestedPath = propertyPath.substring(pos + 1);
        AbstractNestablePropertyAccessor nestedPa = this.getNestedPropertyAccessor(nestedProperty);
        return nestedPa.getPropertyAccessorForPropertyPath(nestedPath);
    } else {
        return this;
    }
}
然后会判断属性名中是否存在.[]等字符,将属性名按.切成两半,前半作为参数调用调用getNestedPropertyAccessor,修改一下输入的属性名加个.再重开调试:
private AbstractNestablePropertyAccessor getNestedPropertyAccessor(String nestedProperty) {
    if (this.nestedPropertyAccessors == null) {
        this.nestedPropertyAccessors = new HashMap();
    }

    AbstractNestablePropertyAccessor.PropertyTokenHolder tokens = this.getPropertyNameTokens(nestedProperty);
    String canonicalName = tokens.canonicalName;
    Object value = this.getPropertyValue(tokens);
    ...

    AbstractNestablePropertyAccessor nestedPa = (AbstractNestablePropertyAccessor)this.nestedPropertyAccessors.get(canonicalName);
    if (nestedPa != null && nestedPa.getWrappedInstance() == ObjectUtils.unwrapOptional(value)) {
        ...
    } else {
        ...

        nestedPa = this.newNestedPropertyAccessor(value, this.nestedPath + canonicalName + ".");
        ...
    }

    return nestedPa;
}
可以看到value是个Object对象,最后会放入nestedPa中返回,看起来是对象绑定的主体,跟入getPropertyValue:
String propertyName = tokens.canonicalName;
String actualName = tokens.actualName;
AbstractNestablePropertyAccessor.PropertyHandler ph = this.getLocalPropertyHandler(actualName);
调用getLocalPropertyHandler获取属性处理对象,再跟入:
protected BeanWrapperImpl.BeanPropertyHandler getLocalPropertyHandler(String propertyName) {
    PropertyDescriptor pd = this.getCachedIntrospectionResults().getPropertyDescriptor(propertyName);
    return pd != null ? new BeanWrapperImpl.BeanPropertyHandler(pd) : null;
}
getCachedIntrospectionResults会依据User类新建一个处理对象返回:
results = new CachedIntrospectionResults(beanClass);
...
CachedIntrospectionResults existing = (CachedIntrospectionResults)classCacheToUse.putIfAbsent(beanClass, results);
return existing != null ? existing : results;
CachedIntrospectionResults的构造函数中调用getBeanInfo获取对象属性信息:
private static BeanInfo getBeanInfo(Class<?> beanClass) throws IntrospectionException {
    Iterator var1 = beanInfoFactories.iterator();

    BeanInfo beanInfo;
    do {
        if (!var1.hasNext()) {
            return shouldIntrospectorIgnoreBeaninfoClasses ? Introspector.getBeanInfo(beanClass, 3) : Introspector.getBeanInfo(beanClass);
        }

        BeanInfoFactory beanInfoFactory = (BeanInfoFactory)var1.next();
        beanInfo = beanInfoFactory.getBeanInfo(beanClass);
    } while(beanInfo == null);

    return beanInfo;
}
来到Java内部Introspector类的getBeanInfo函数中,除了获取对象自身的属性信息,还会去找父类的属性信息,于是在找父类java.lang.Object的属性信息时调用的getTargetPropertyInfo函数中:
if (argCount == 0) {
    if (name.startsWith(GET_PREFIX)) {
        // Simple getter
        pd = new PropertyDescriptor(this.beanClass, name.substring(3), method, null);
    } else if (resultType == boolean.class && name.startsWith(IS_PREFIX)) {
        // Boolean getter
        pd = new PropertyDescriptor(this.beanClass, name.substring(2), method, null);
    }
}
如果存在isXXX和getXXX就会将后面的部分作为一个属性,也就导致了User类多了个叫做class的属性,也就导致了在getPropertyDescriptor函数中:
PropertyDescriptor getPropertyDescriptor(String name) {
    PropertyDescriptor pd = (PropertyDescriptor)this.propertyDescriptors.get(name);
    if (pd == null && StringUtils.hasLength(name)) {
        pd = (PropertyDescriptor)this.propertyDescriptors.get(StringUtils.uncapitalize(name));
        if (pd == null) {
            pd = (PropertyDescriptor)this.propertyDescriptors.get(StringUtils.capitalize(name));
        }
    }

    return pd;
}
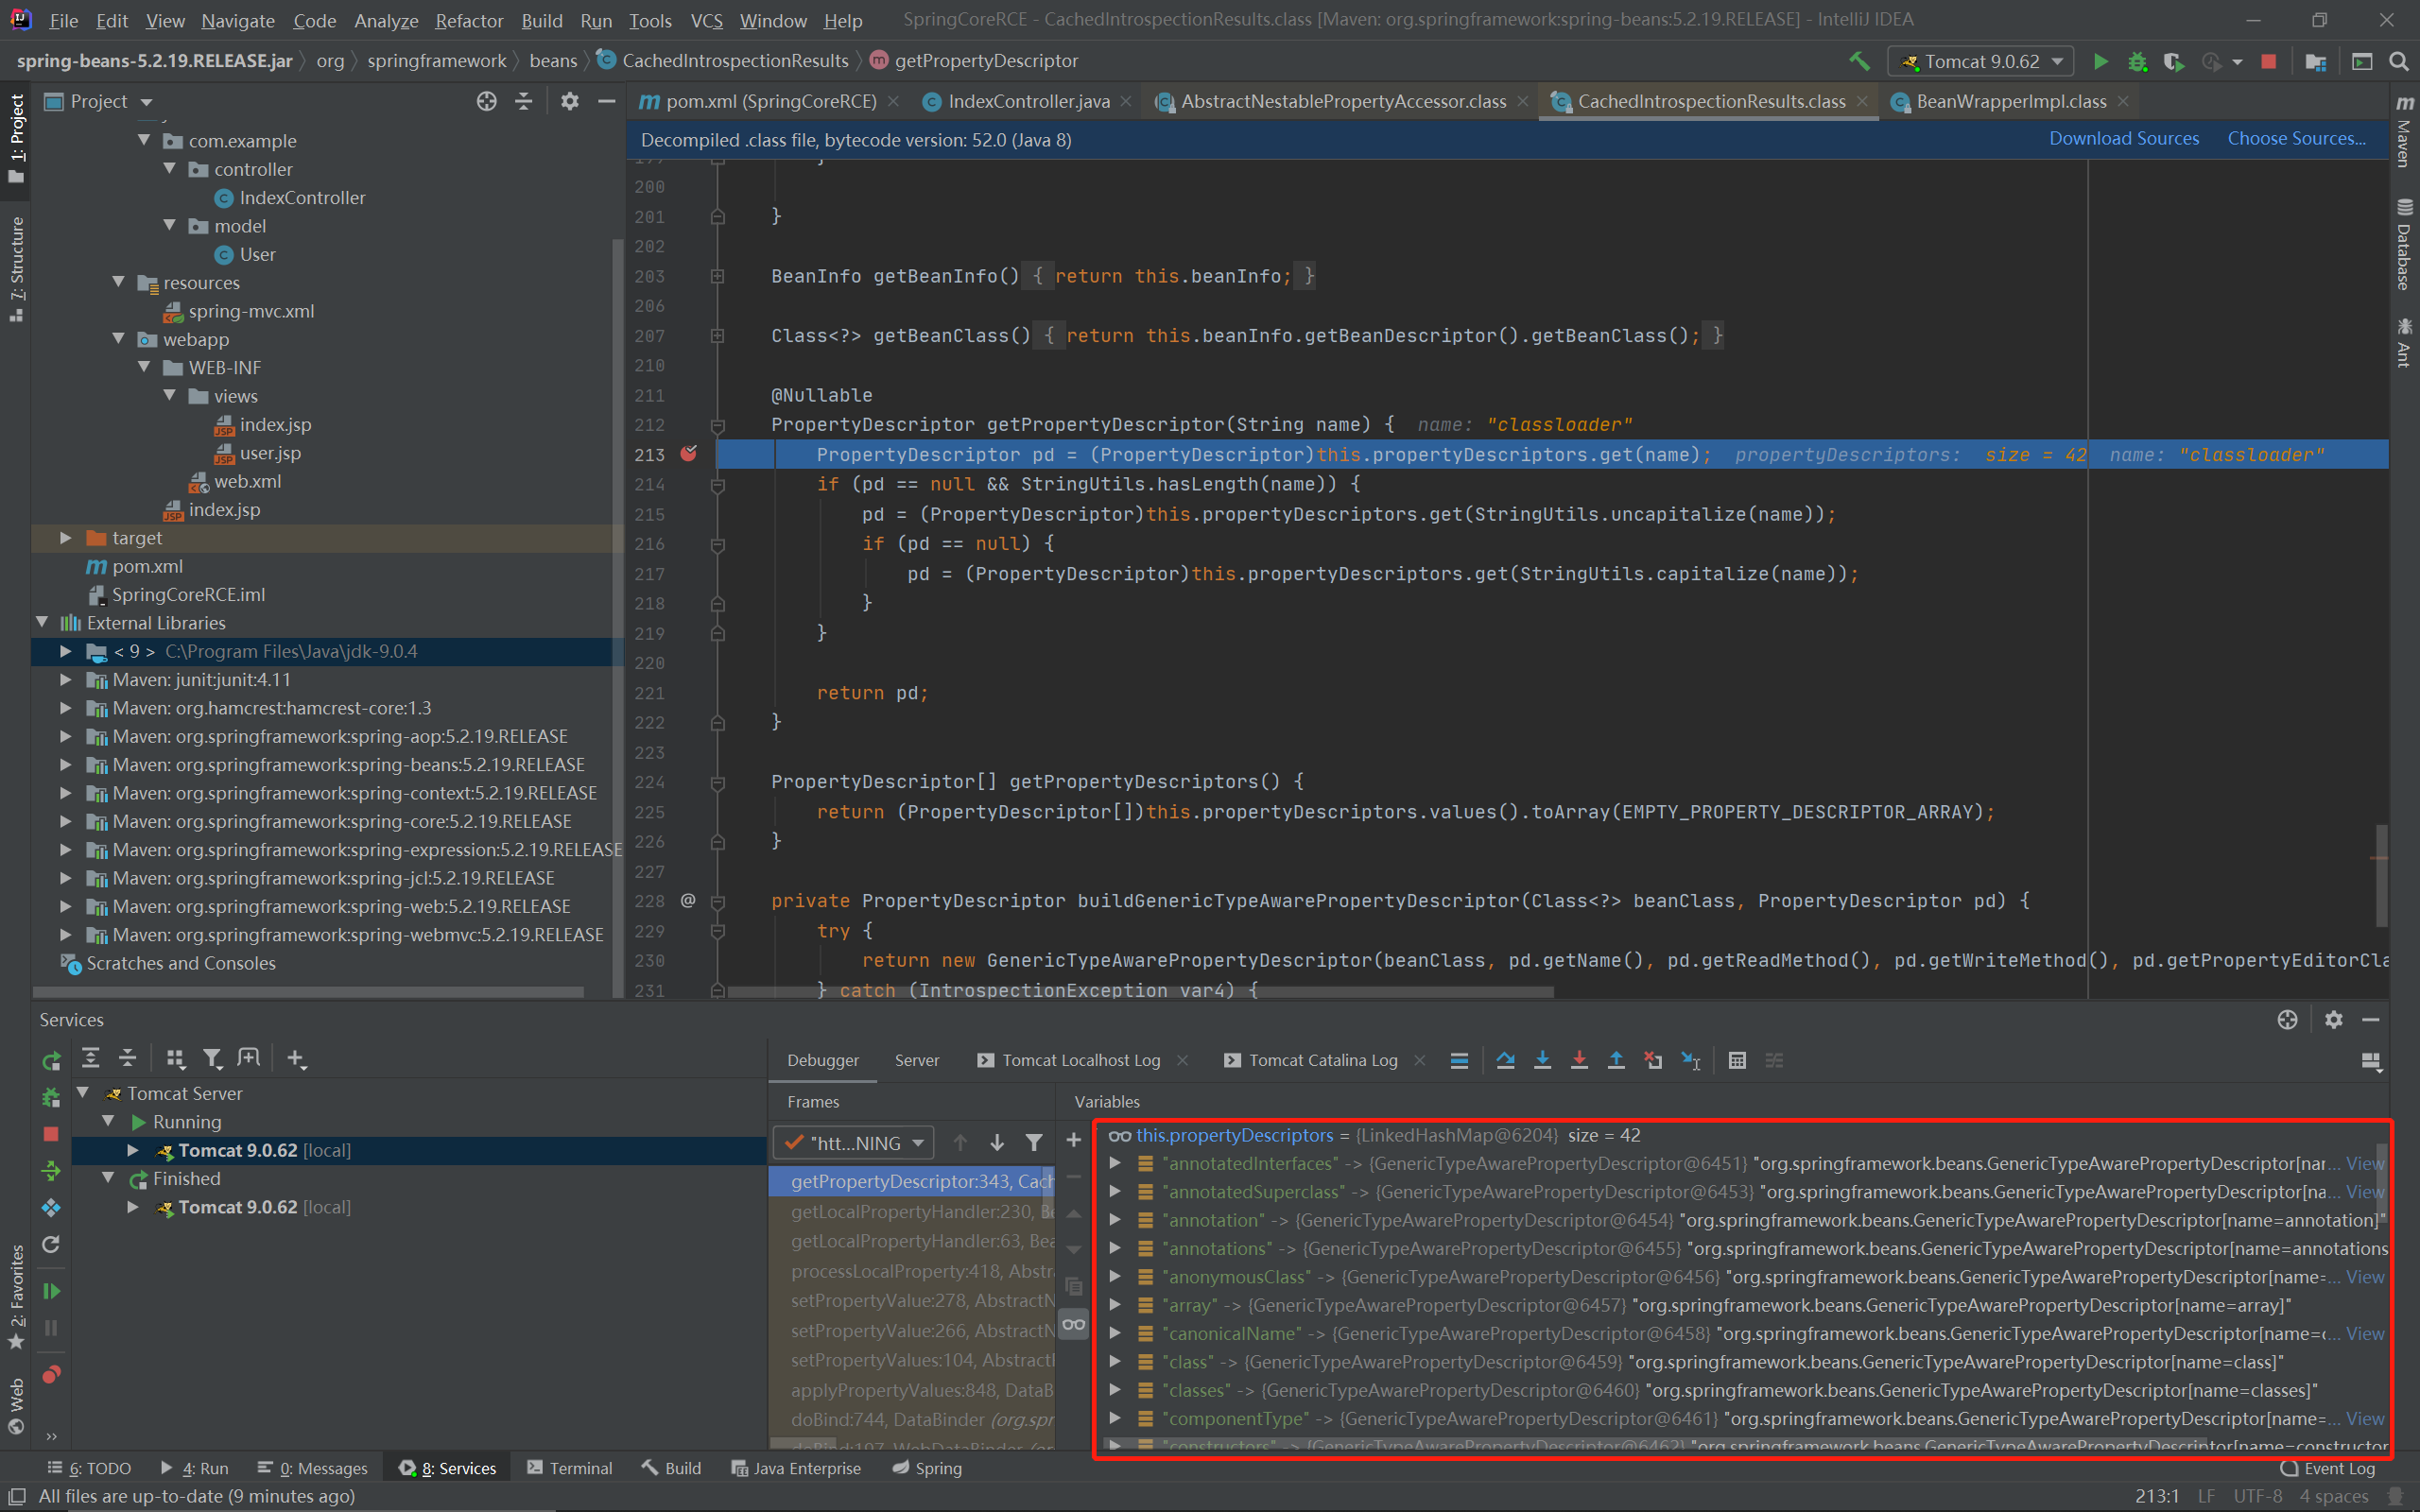
而propertyDescriptors中除了我们定义的4个属性的描述符外还有一个奇怪的东西:
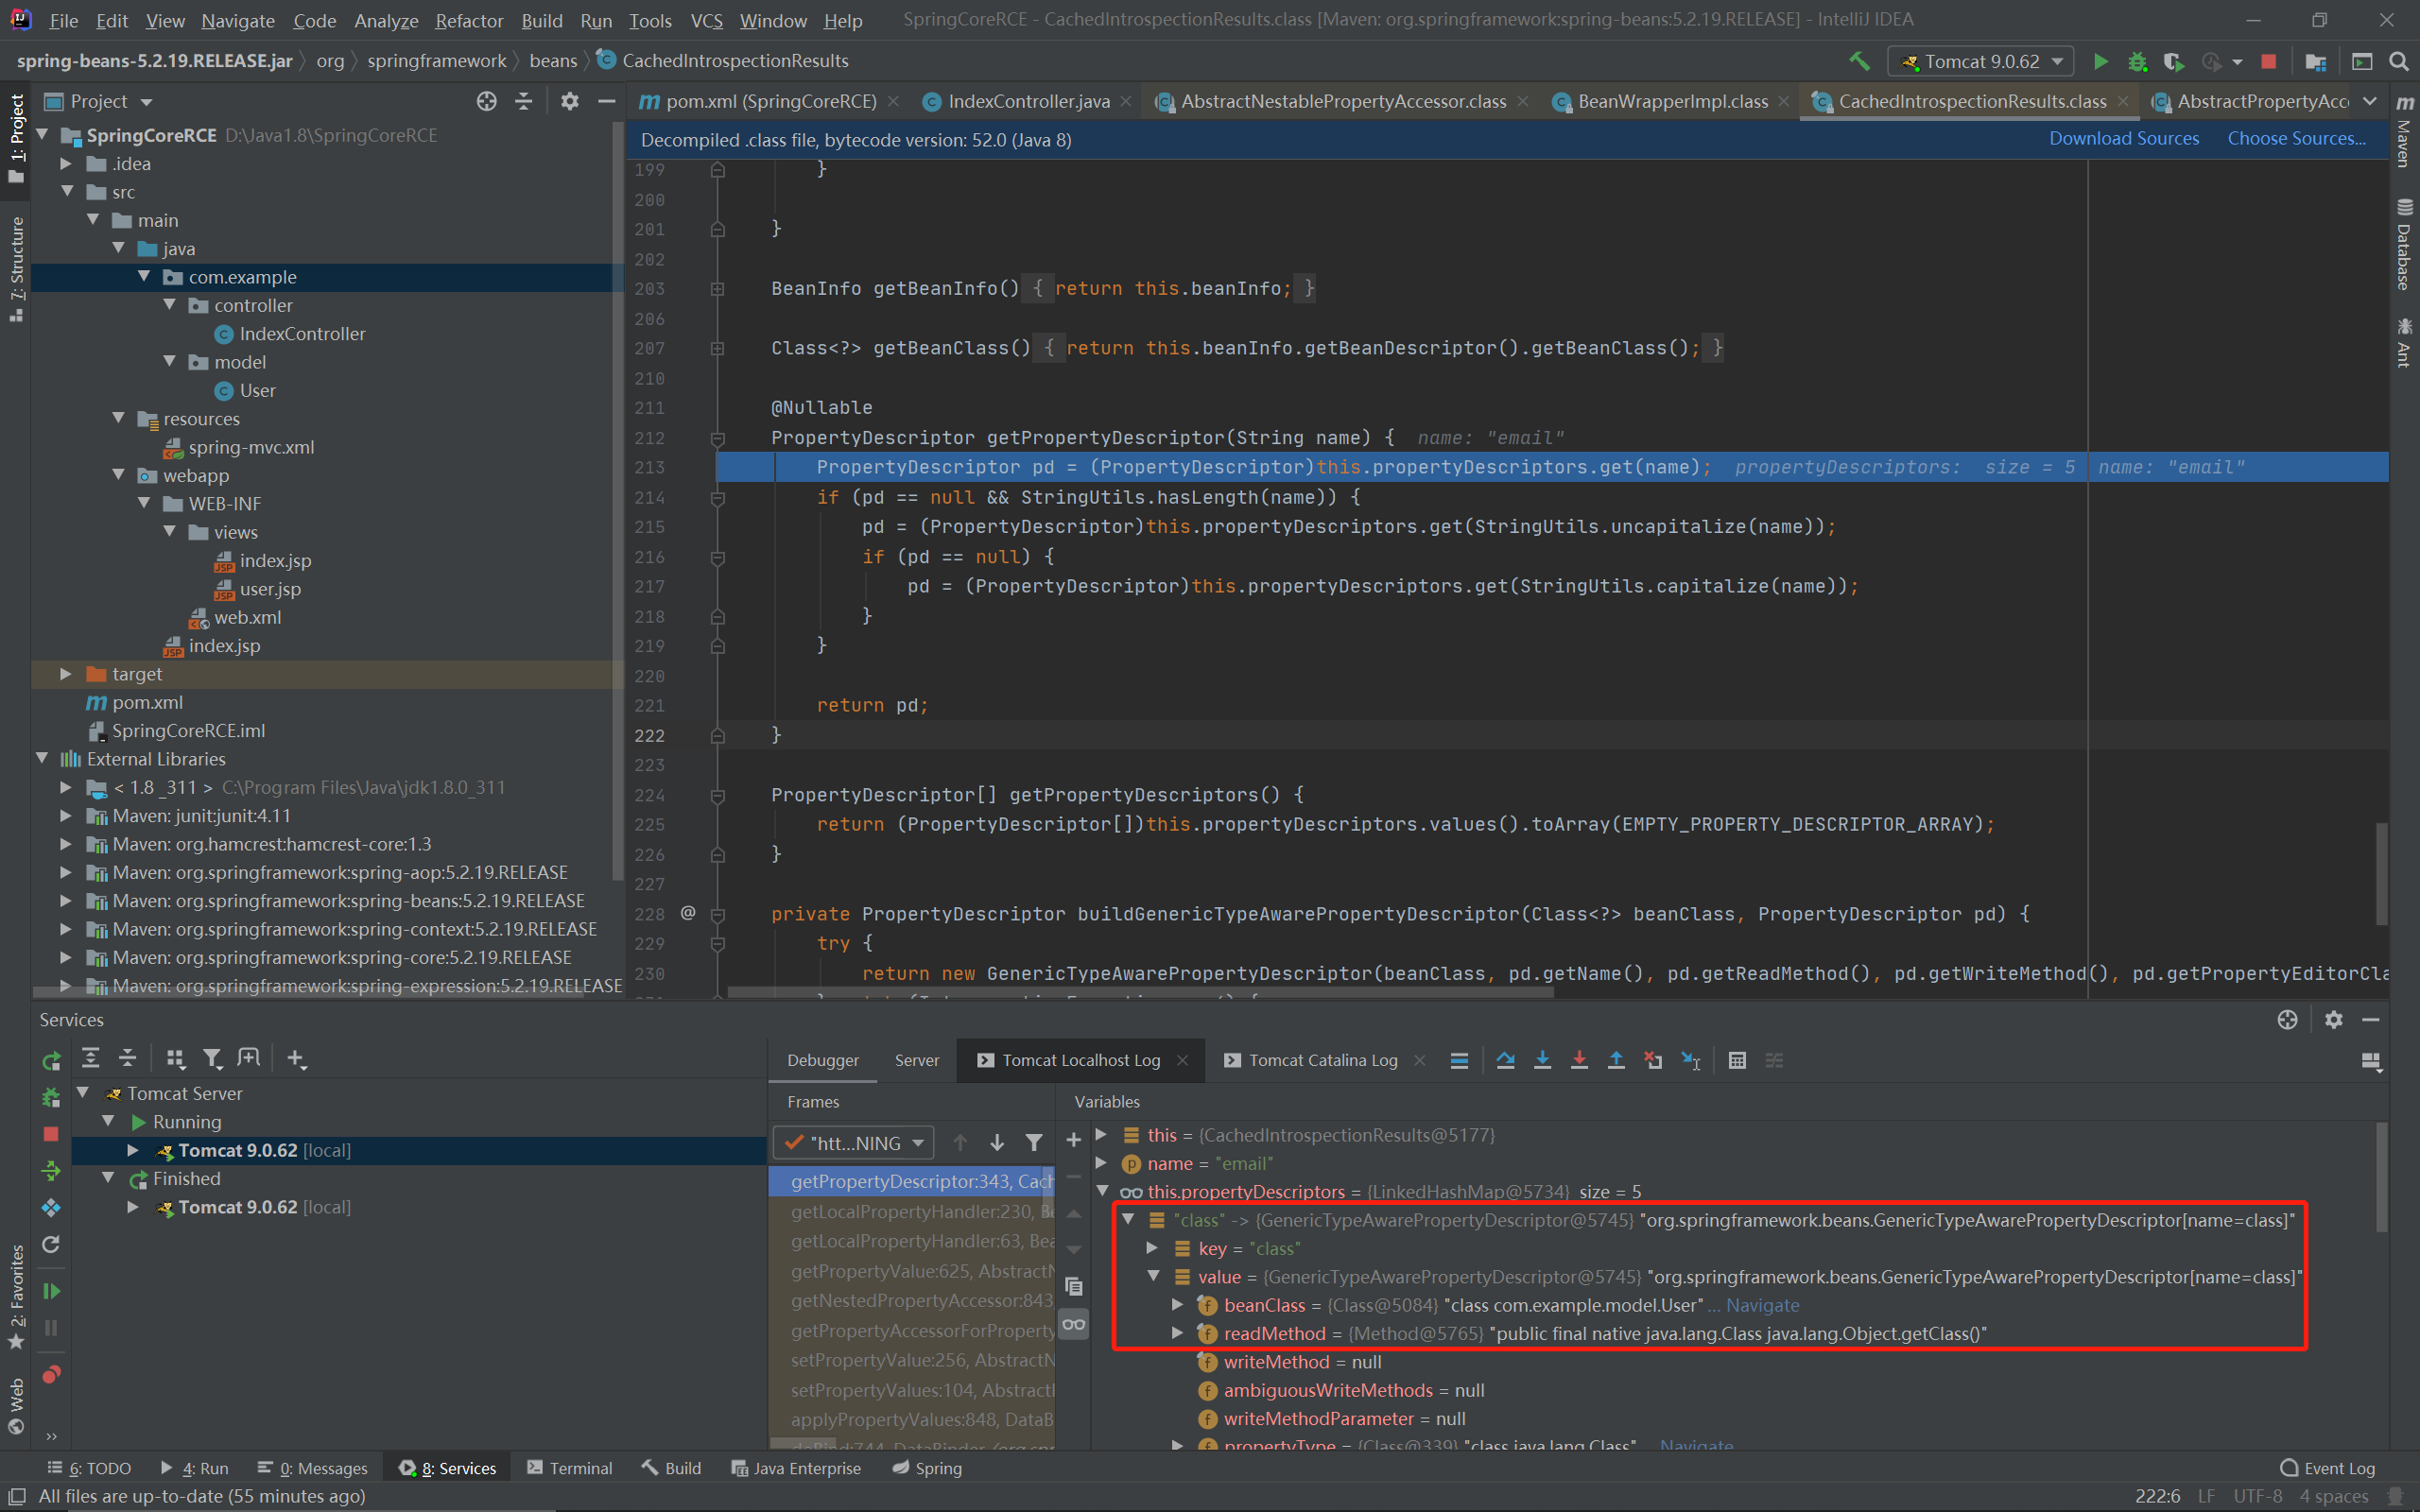
其getter为getClass,也就是说我们可以通过class.xxx访问user.getClass.xxx:
漏洞利用
在JDK9+环境下,getTargetPropertyInfo的属性信息从缓存中获取:
Map.Entry<String,PropertyInfo> entry : ClassInfo.get(this.beanClass).getProperties().entrySet()
ClassInfo的get函数如下:
public static ClassInfo get(Class<?> type) {
    if (type == null) {
        return DEFAULT;
    }
    try {
        checkPackageAccess(type);
        return CACHE.get(type);
    } catch (SecurityException exception) {
        return DEFAULT;
    }
}
最后从CACHE中取出该类的属性信息,CACHE在项目运行时开始构建,最后来到PropertyInfo类的get函数:
switch (method.getParameterCount()) {
    case 0:
        if (returnType.equals(boolean.class) && isPrefix(name, "is")) {
            PropertyInfo info = getInfo(map, name.substring(2), false);
            info.read = new MethodInfo(method, boolean.class);
        } else if (!returnType.equals(void.class) && isPrefix(name, "get")) {
            PropertyInfo info = getInfo(map, name.substring(3), false);
            info.readList = add(info.readList, method, method.getGenericReturnType());
        }
        break;
    case 1:
        if (returnType.equals(void.class) && isPrefix(name, "set")) {
            PropertyInfo info = getInfo(map, name.substring(3), false);
            info.writeList = add(info.writeList, method, method.getGenericParameterTypes()[0]);
        } else if (!returnType.equals(void.class) && method.getParameterTypes()[0].equals(int.class) && isPrefix(name, "get")) {
            PropertyInfo info = getInfo(map, name.substring(3), true);
            info.readList = add(info.readList, method, method.getGenericReturnType());
        }
        break;
    case 2:
        if (returnType.equals(void.class) && method.getParameterTypes()[0].equals(int.class) && isPrefix(name, "set")) {
            PropertyInfo info = getInfo(map, name.substring(3), true);
            info.writeList = add(info.writeList, method, method.getGenericParameterTypes()[1]);
        }
        break;
}
根据函数参数数量获取参数,比JDK8+更复杂获取的结果也更多了,原本这里是有classLoader的:
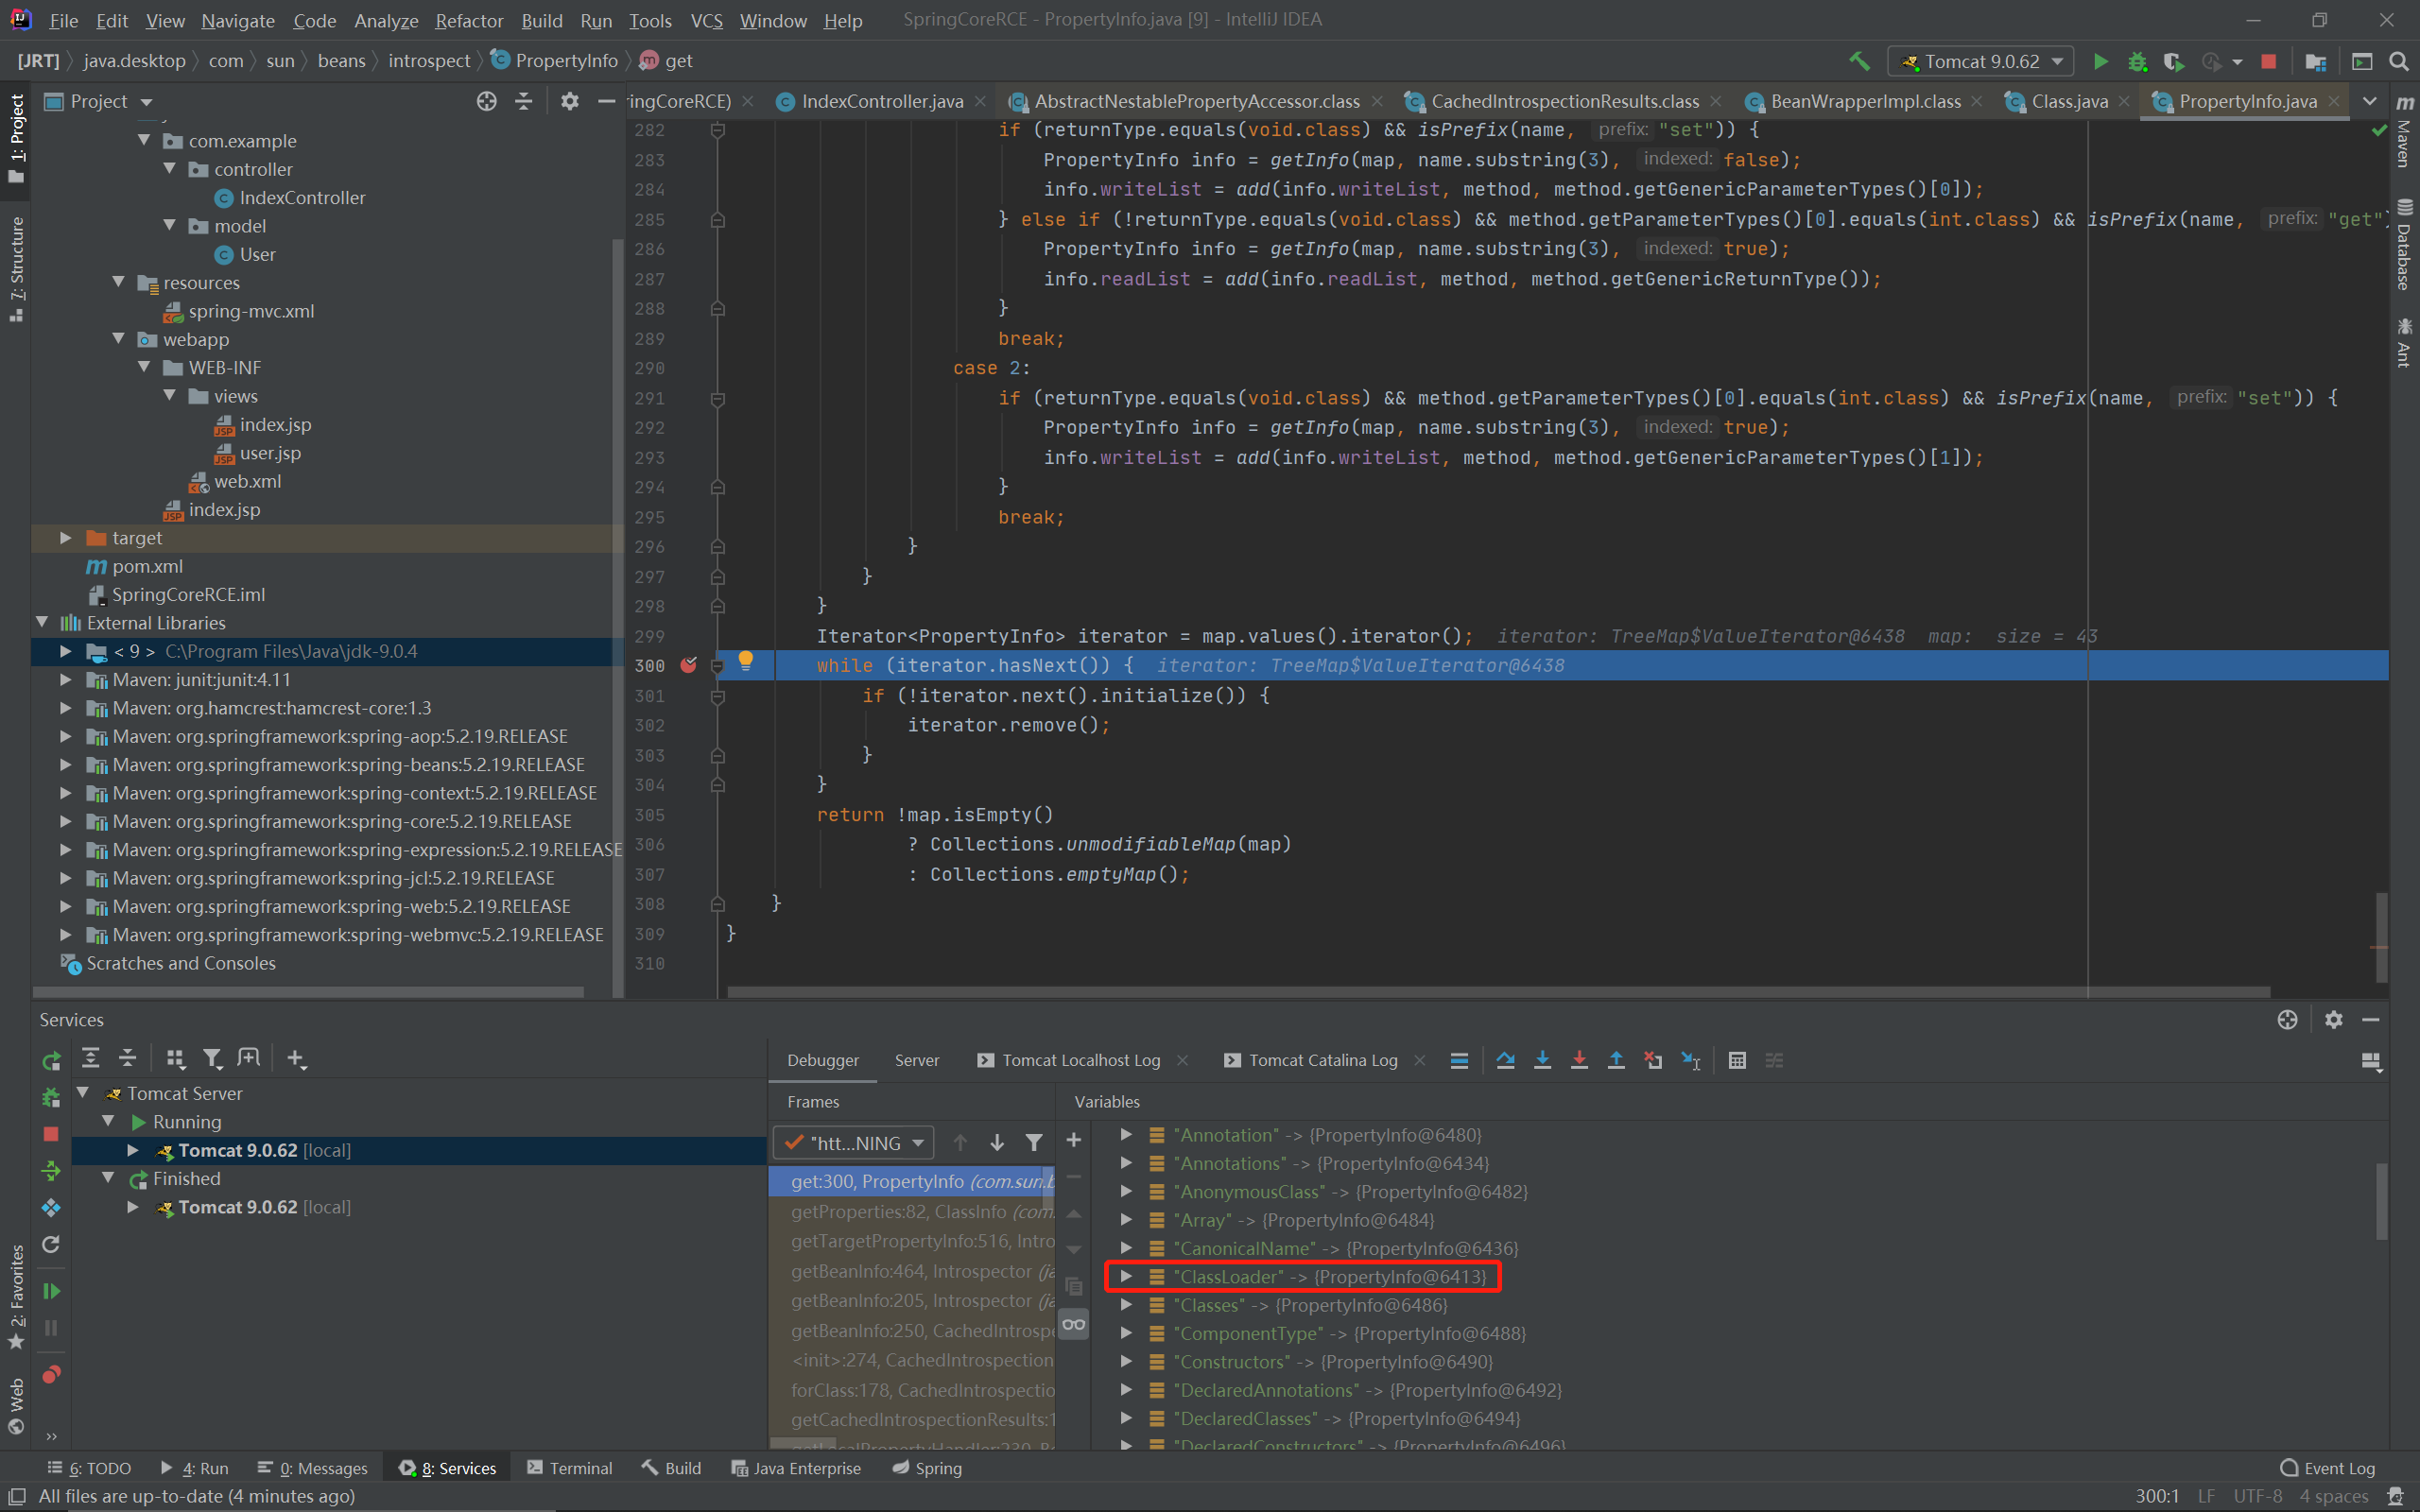
但是回到CachedIntrospectionResults类的构造函数函数后,它会遍历所有属性信息,然后:
if (Class.class != beanClass || !"classLoader".equals(pd.getName()) && !"protectionDomain".equals(pd.getName())) {
    ...

    pd = this.buildGenericTypeAwarePropertyDescriptor(beanClass, pd);
    this.propertyDescriptors.put(pd.getName(), pd);
}
将Class中的classLoader给吃掉了,所以无法直接通过class.classloader来获取classloader。
但是Class中存在module:
private final ClassLoader loader;
可以通过class.module.classLoader获得一个classloader:
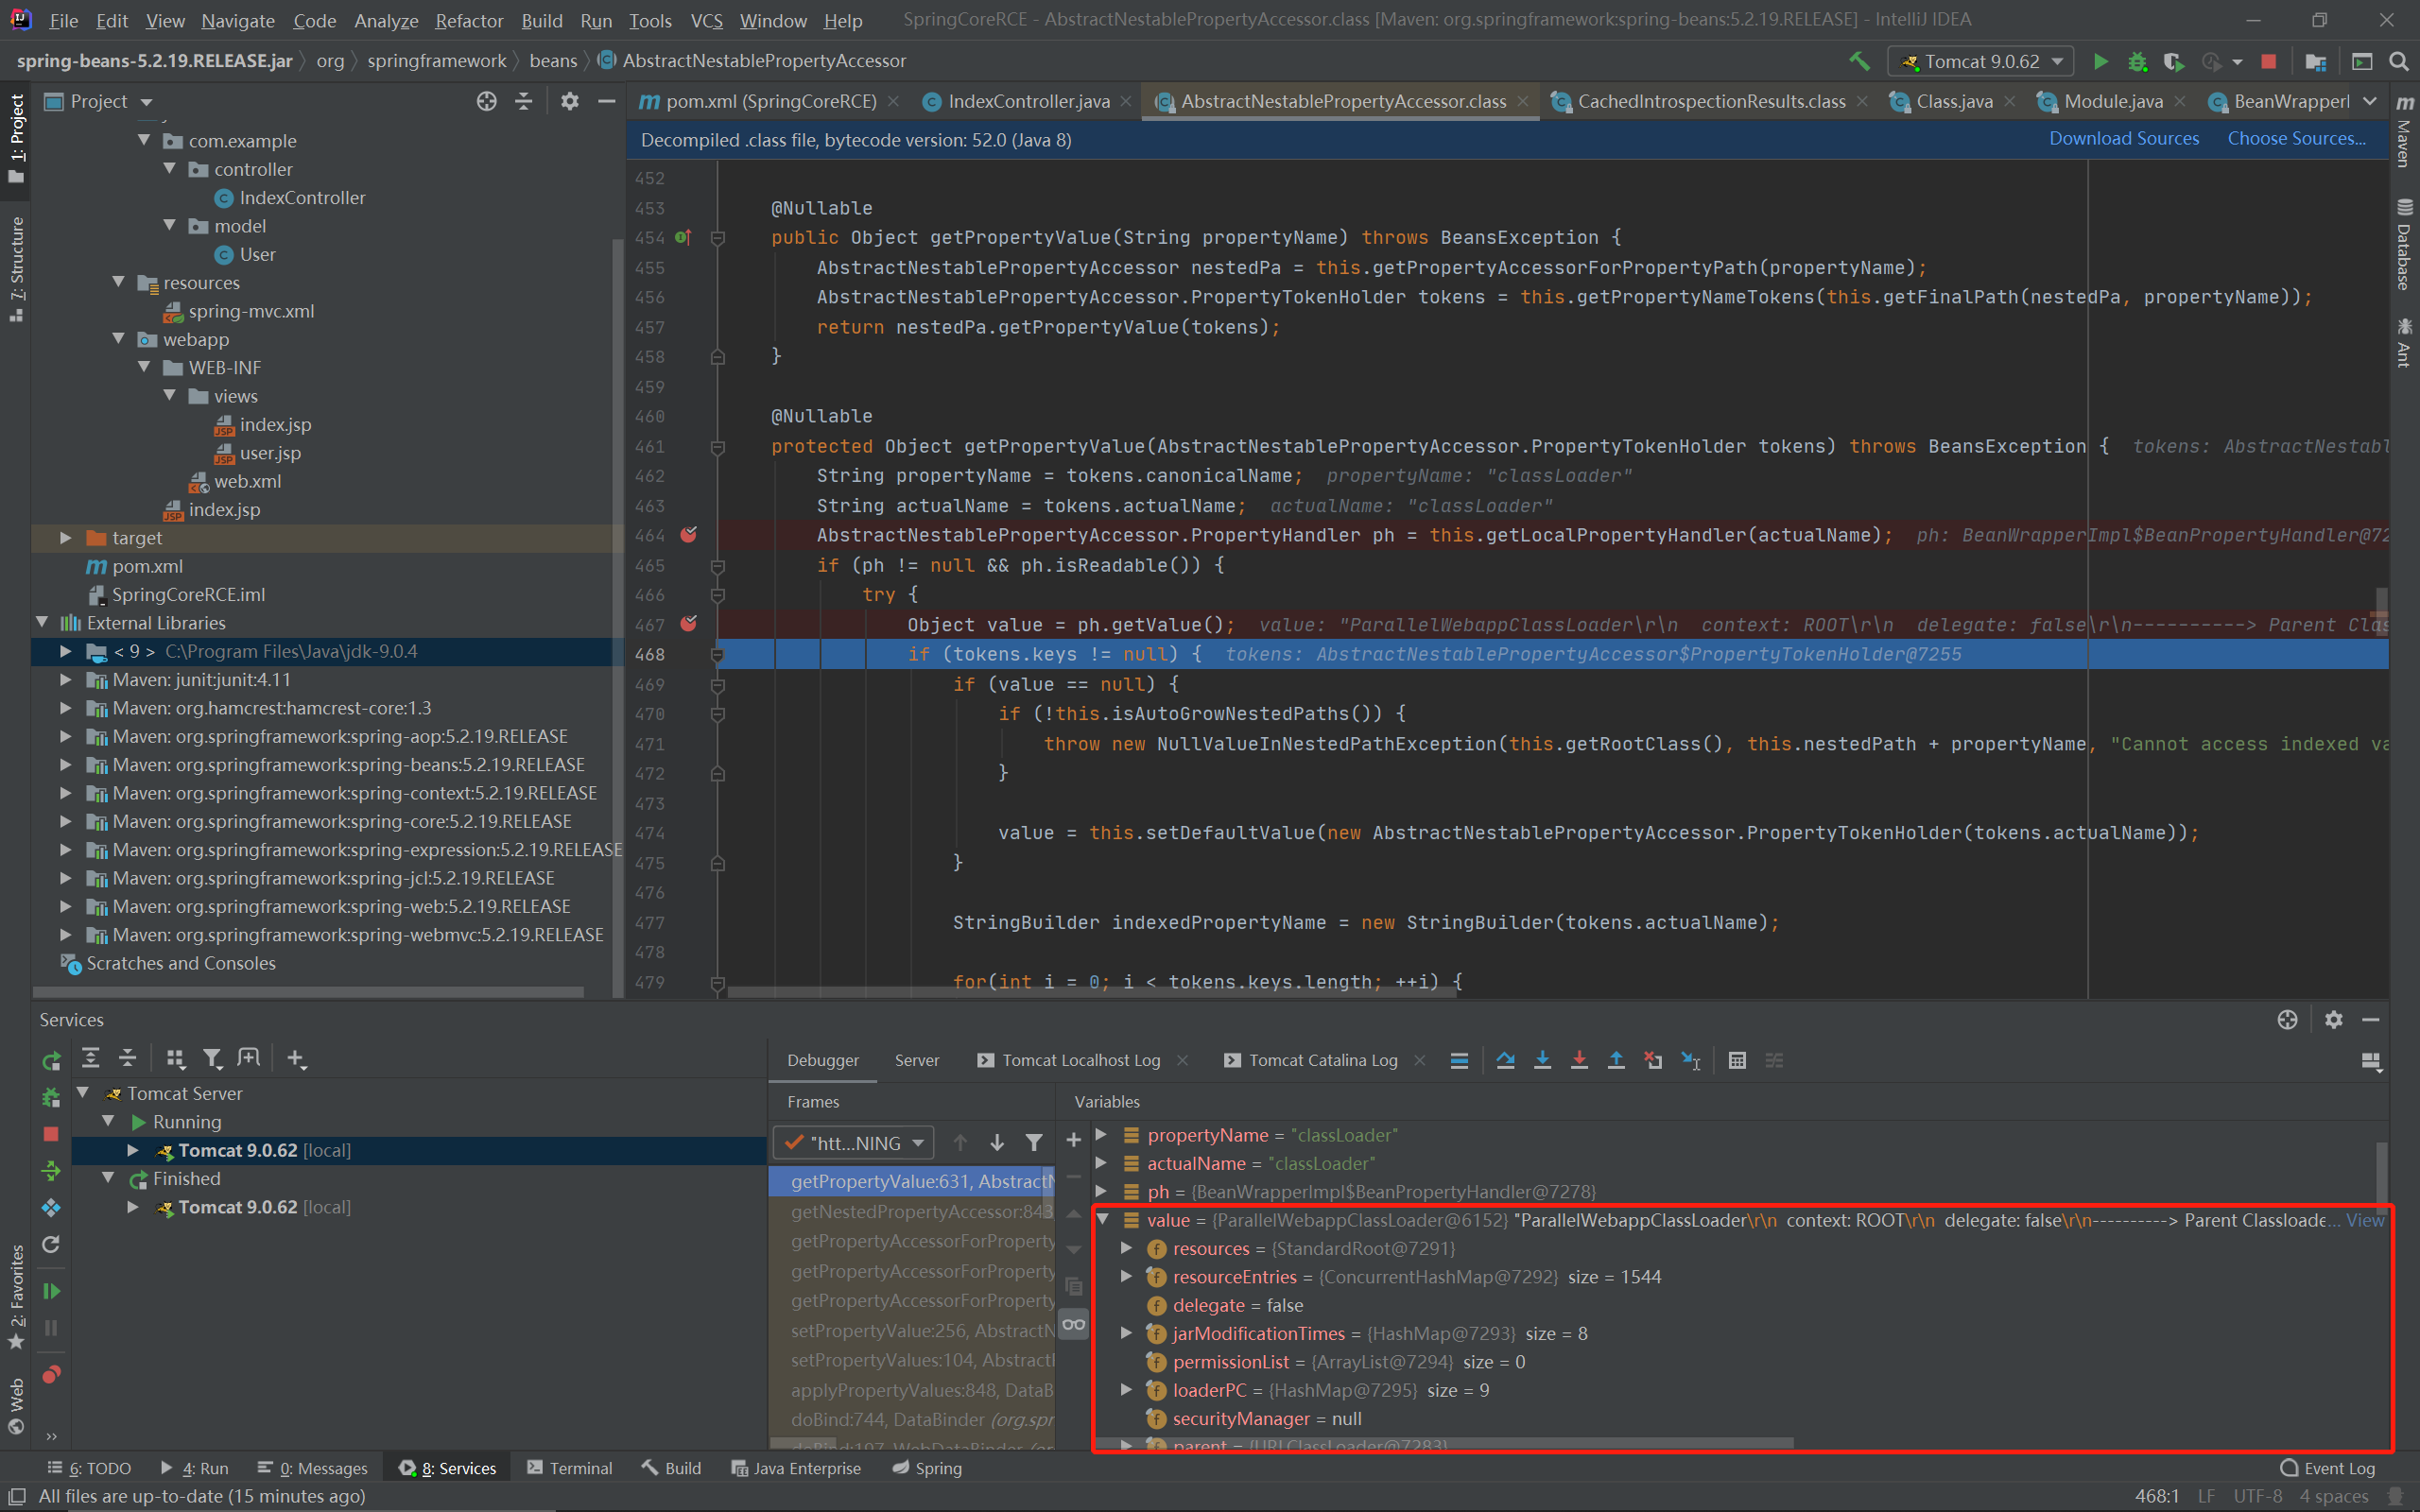
class.module.classLoader.resources.context获取Tomcat的context时问题又来了,我使用的Tomcat版本为9.0.62,该版本下的getResources函数为:
/** @deprecated */
@Deprecated
public WebResourceRoot getResources() {
    return null;
}
已经被废弃了,无法获取resources。
没办法,再下载多一个Tomcat8.0.53,其getResources为:
public WebResourceRoot getResources() {
    return this.resources;
}
还是可以利用的,所以这payload在高版本Tomcat下面也打不通,但不排除还有其他玩法。
最后打法可以看参考文章,通过修改日志文件目录和后缀的方式完成getshell。
漏洞修复
在5.2.20.RELEASE版本下,CachedIntrospectionResults类的构造函数做了更多限制:
PropertyDescriptor pd = var3[var5];
if ((Class.class != beanClass || "name".equals(pd.getName()) || pd.getName().endsWith("Name")) && (pd.getPropertyType() == null || !ClassLoader.class.isAssignableFrom(pd.getPropertyType()) && !ProtectionDomain.class.isAssignableFrom(pd.getPropertyType()))) {
    ...

    pd = this.buildGenericTypeAwarePropertyDescriptor(beanClass, pd);
    this.propertyDescriptors.put(pd.getName(), pd);
}
无法获取类型为ClassLoader的属性了。